| Hangar |
Aircraft |
Category |
Date |
Preview |
| SteveM | Dumas Kit #1815,DeHavilland DH89 Dragon Rapide | Build | 31-Jan-11 22:00 |  | | Views : 857 | | Detail view showing the alignment of parts FW and FWST. Mine had some slop in the fit and the plans made it look like the tops are flush, but you want to make the bottom edges flush instead. |
| SteveM | Dumas Kit #1815,DeHavilland DH89 Dragon Rapide | Build | 30-Jan-11 00:24 | 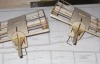 | | Views : 976 | | Both motor mounts are finished. I went with PVA glue again for strength and to have time to make sure all was aligned before the glue set. |
| SteveM | Dumas Kit #1815,DeHavilland DH89 Dragon Rapide | Build | 21-Jul-10 19:00 | 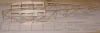 | | Views : 1019 | | Fuselage is starting to come together. Bending the curves for the nose was a little tricky, but I brushed on water and let it soak and added a little more bend each day I worked on it till it was fully curved. Lots of butt joints, I hope they hold up. |
| SteveM | Dumas Kit #1815,DeHavilland DH89 Dragon Rapide | Build | 10-Jul-10 00:55 | 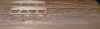 | | Views : 1000 | | The sides are complete, starting now on the bottom and top. |
| SteveM | Dumas Kit #1815,DeHavilland DH89 Dragon Rapide | Build | 30-Jun-10 20:59 | 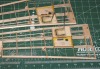 | | Views : 1116 | | I cleaned out the thread holes with a pin vice then hardened the end of the thread with CA to act as a sort of needle. Rather than use thin CA to held everything together I opted for some 30 minute epoxy. It does add a little weight but I think it is worth it considering how rough some of my landings can get. |
| SteveM | Dumas Kit #1815,DeHavilland DH89 Dragon Rapide | Build | 23-Jun-10 21:33 | 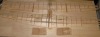 | | Views : 1023 | | Lower wings also assembled and sanded to shape. |
|
| Hangar |
Aircraft |
Category |
Date |
Preview |
| SteveM | Dumas Kit #1815,DeHavilland DH89 Dragon Rapide | Build | 29-Mar-10 22:04 | 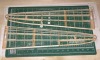 | | Views : 1287 | | Upper wings assembled and sanded to shape. The plans give no indication of how many hinges to use and where to put them so I elected to put one near each end of the ailerons. |
| SteveM | Dumas Kit #1815,DeHavilland DH89 Dragon Rapide | Build | 25-Mar-10 22:33 | 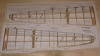 | | Views : 1091 | | Ready for the leading edge laminations then the stringers. |
| SteveM | Dumas Kit #1815,DeHavilland DH89 Dragon Rapide | Build | 25-Mar-10 22:32 | 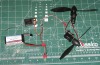 | | Views : 1175 | | I've decided to stick with the recommended MPI EPU-3 motors, GWS 7x6 props, and TP 2S 1350mAh battery. Each motor drew about 2.75A on a 50% full battery so I hope the little Pixie-7P will be able to handle the current of two motors on a fully charged battery. Regardless, there is no need for a 25A ESC as is recommended in the directions. |
| SteveM | Dumas Kit #1815,DeHavilland DH89 Dragon Rapide | Build | 24-Mar-10 16:12 | 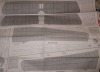 | | Views : 966 | | The plans for the 53" Guillow's B-29 shown at the bottom are the largest I have on hand. By arranging the wing patterns across the path of the paper going through the printer any distortion will be applied to both wings. The Sopwith Camel plans above it have the same layout the DH-89 has, providing potential for the left wings to both be shorter than the right wings. But of course they were dead on. |
| SteveM | Dumas Kit #1815,DeHavilland DH89 Dragon Rapide | Build | 23-Mar-10 20:55 | 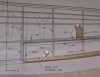 | | Views : 934 | | The upper right wing on the plans is not to scale as you can see by this 3/32" gap at the end of the ailerion T.E. (Part A9) |
| SteveM | Dumas Kit #1815,DeHavilland DH89 Dragon Rapide | Build | 22-Mar-10 21:48 | 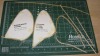 | | Views : 981 | | Making the tail feather outlines. I elected to make the bowing forms out of a lamination of 1/8" and 1/16" balsa sheet. It would have been easier to use some 3/8" thick by 6" wide sheet I had, but I couldn't bear to carve it up when I had a pile of low quality balsa from Tower Hobbies on hand. Notice I had plenty of broken sticks. |
|
