| Hangar |
Aircraft |
Category |
Date |
Preview |
| pfinn | Dumas Kit #220, Westland Lysander | Build | 31-Jan-10 20:50 | 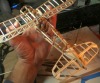 | | Views : 977 | | Slowly but surely... Basic 1/16" square balsa Stab but added very lightweight 1/32" caps and sanded to airfoil (max thickness at 25-30% to .020" (about) at trailing edge. Offset hinge line. If this "Lead Sled" is going to fly, it's going to need all the help it can get! |
| pfinn | Dumas Kit #220, Westland Lysander | Build | 26-Jan-10 20:09 | 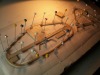 | | Views : 692 | | Back to the Lysander. Chunky beginnings of the tailgroup. The elevator (er?) is split, hence more of the wire bend-a-roo's. Actual hinges this time... |
| pfinn | Dumas Kit #220, Westland Lysander | Reference | 15-Dec-09 13:11 |  | | Views : 812 | | Just couldn't resist. [;o)] |
| pfinn | Dumas Kit #220, Westland Lysander | Build | 15-Dec-09 05:26 | 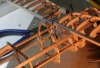 | | Views : 861 | | More "Monkey Motion". Aileron linkage pretty much figured out. Flaps just need servo and pushrod install. The wings will slide on and off and be held in place with some neodymium magnets as well as the struts. |
| pfinn | Dumas Kit #220, Westland Lysander | Build | 08-Dec-09 03:30 | 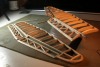 | | Views : 853 | | Remove from taped support (need a bit of patience there), cut control surfaces. in this case, two cuts through the trailing edge lamination. Viola! Ailerons and flaps. Flaps are bottom hinged, ailerons, top. |
| pfinn | Dumas Kit #220, Westland Lysander | Build | 08-Dec-09 03:23 | 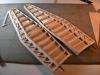 | | Views : 736 | | Bonded, sanded, and tortional stiffeners installed. Gusseting comes later. |
|
| Hangar |
Aircraft |
Category |
Date |
Preview |
| pfinn | Dumas Kit #220, Westland Lysander | Build | 08-Dec-09 03:21 | 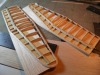 | | Views : 657 | | Then just continue with main wing then control surfaces and box in (where needed). Ileft all these oversize in heighth for sanding after bonding. These are not bonded yet because the tape is holding it all together till I'm sure it's satisfactory. |
| pfinn | Dumas Kit #220, Westland Lysander | Build | 08-Dec-09 03:15 | 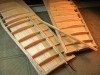 | | Views : 660 | | Starting with the main wing side, I opened up a slot to accept the sub spar(?) with clearance for the aileron torque tube, notches for ribs, and a 1.5 degree angled slot for carbon fiber locator pin. |
| pfinn | Dumas Kit #220, Westland Lysander | Build | 08-Dec-09 03:07 | 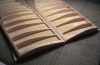 | | Views : 700 | | cutting. I cut down the hinge line with a razor. |
| pfinn | Dumas Kit #220, Westland Lysander | Build | 08-Dec-09 03:05 | 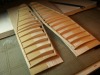 | | Views : 646 | | Back to the wings. Cutting control surfaces. After an almost finish sanding, I double stick taped the wings to some 1/32" balsa sheet to keep things in place while... |
| pfinn | Dumas Kit #220, Westland Lysander | Build | 06-Dec-09 00:47 | 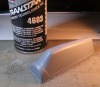 | | Views : 732 | | This is the primer I use. It's the best "Rattle Can" primer I've ever used. EVER. High build, recoat every 5 min. (three coats fills and hides 220 scratch) at 75-80 deg F (10 min today at 60 deg), ready to sand in 1 hour. Sands like a dream come true. Non filling puffy dust. The picture is unsanded. Both my Guillows ser 500 me 109 and jfinn's FW 190 were both primed with this. Covering flexibilty is not an issue. Once again, pricey. $20.00 a can. And again, worth every penny. |
| pfinn | Dumas Kit #220, Westland Lysander | Build | 06-Dec-09 00:29 | 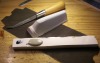 | | Views : 654 | | Rasp for roughing (that's actually my Soapstone rasp). The abrasive mesh is actually a Drywall Mud sanding sheet. Works great with plaster, flller without clogging plus there's abrasive on both sides and waterproof. Home Depot and such. And finally if you don't already, for small, multiple fills (pinholes, accidental rasp diggers ;o0 ), I'll plop down some filler and catalyst. Use a small spatula, oil painting pallette knife works great, scoop up some filler, about a 1/4" bead or so, off to the side, dab the tip of the spatula and pick up a tiny bit of catalyst and mix a small portion, apply, scrape off unused filler before it goes off, wipe off spatula. repeat. This ensures a good bond because you don't end up trying to get that last 10 second too late batch to stick and smooth out. If you don't get it, I'll take a series of pics to show how. My explaination may be a bit....vague. |
|
