| Hangar |
Aircraft |
Category |
Date |
Preview |
| hjlittman | Guillows Series 300 - Piper Cub 95 | Build | 06-Mar-12 16:52 | 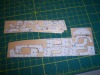 | | Views : 603 | | Again, printing from scans of the plans, I layed out the formers for cutting, There are some modifications, however. The formers from B1 to B5 are on 1/20" sheet and the formers from B6 aft are 1/32" sheet to keep it light. The hole for the rubber cavity has been enlarged since flying my other Piper 95 showed the need for the additional rubber room. The stringer positions from former B5 aft have been adjusted so that the stringers will be in scale positions for the L-4, and the keel notches, top, bottom, and sides have been adjusted for narrower keels, again for lightness. |
| hjlittman | Guillows Series 300 - Piper Cub 95 | Build | 06-Mar-12 16:47 | 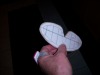 | | Views : 607 | | Even the stabilizer outline is no problem. |
| hjlittman | Guillows Series 300 - Piper Cub 95 | Build | 06-Mar-12 16:46 | 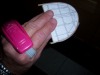 | | Views : 649 | | All you have to do is soak the wood strips in water, apply the glue (Original Gorilla Glue in this case), bend them around the mold, tape them down all around, and put them aside overnight to dry. You gotta love the Scotch Pre-Cut tame dispenser. My wife introduce me to that for gift wrapping and it come is real handy for this. |
| hjlittman | Guillows Series 300 - Piper Cub 95 | Build | 06-Mar-12 16:43 | 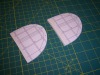 | | Views : 558 | | Molds for the wing tip laminations. |
| hjlittman | Guillows Series 300 - Piper Cub 95 | Build | 06-Mar-12 16:42 | 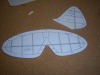 | | Views : 525 | | Printing scans of other parts of the plans I glued them to foam core board and cut them out to make molds for outline laminations. |
| hjlittman | Guillows Series 300 - Piper Cub 95 | Build | 06-Mar-12 16:40 | 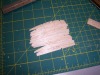 | | Views : 543 | | Sand the stack right to the pattern, cut the spar notches, pull the pins and you have a stack of 20 identical ribs. Then I cut the four smaller tip ribs. The whole process to make 24 ribs took less than 1/2 hour. |
|
| Hangar |
Aircraft |
Category |
Date |
Preview |
| hjlittman | Guillows Series 300 - Piper Cub 95 | Build | 06-Mar-12 16:38 |  | | Views : 584 | | Cut down the rear of the stack to the pattern. |
| hjlittman | Guillows Series 300 - Piper Cub 95 | Build | 06-Mar-12 16:37 | 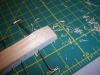 | | Views : 582 | | I turned the stack over and using a fresh blade in my Xacto knife I cut the front curve of the stack down to the pattern. If I had a miniture belt sander this would have gone a lot quicker. |
| hjlittman | Guillows Series 300 - Piper Cub 95 | Build | 06-Mar-12 16:35 | 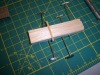 | | Views : 541 | | Using my razor saw and a "Cleveland notcher" I cut the bottom spar notch and inserted a piece of spar stock to help keep the stack in alignment. |
| hjlittman | Guillows Series 300 - Piper Cub 95 | Build | 06-Mar-12 16:34 | 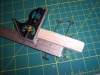 | | Views : 551 | | The rib blanks were stacked evenly and stuck together with some new, sharp, pins. If I had needed more ribs I would have glued them together with Testor's "green glue". That way, when you are done shaping and sanding you can take them apart with acetone. |
| hjlittman | Guillows Series 300 - Piper Cub 95 | Build | 06-Mar-12 16:31 | 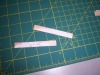 | | Views : 510 | | I use the stacked rib method for cutting ribs on constant chord wings. The rib patterns were cut out from scans of the plans, glued to heavy card stock, cut out, and glued to the rib blanks that would be on the ends of the rib stack. |
| hjlittman | Guillows Series 300 - Piper Cub 95 | Build | 06-Mar-12 16:29 | 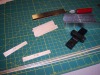 | | Views : 524 | | Since I am building "scratch" , from the plans, I need to cut out some parts. Using my balsa stripper and miter box I cut out 24 rib blanks. Since I am lightening the structure I cut only the root ribs and strut attachment ribs of 1/16" sheet. All the rest are 1/32" sheet |
|
