| Hangar |
Aircraft |
Category |
Date |
Preview |
| rayl | Scratch Built Consolidated XF-92A | Build | 19-Feb-15 08:06 | 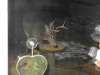 | | Views : 427 | | Night visitor: what a mooch. |
| rayl | Scratch Built Consolidated XF-92A | Build | 16-Feb-15 16:20 | 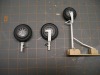 | | Views : 597 | | Here's the whole bunch, ready for painting and installation. BTW; I bought some Testors brush-on acrylic "aluminum", don't bother. I'll be airbrushing them with good old solvent based paint. The nose gear jig will alos serve as it's mounting base when installed in the gear well. And I still need tomount the retraction cylinder on the nose gear llinkage (I forgot to do that until I looked at the image just now). Oh Well. |
| rayl | Scratch Built Consolidated XF-92A | Build | 16-Feb-15 16:08 | 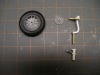 | | Views : 442 | | Must be the day for Landing Gear! Here is the final parts breakdown for the main L.G w/ TIre & Hub, disc brake setup and anti-shimmy sissors. |
| Dale1416 | Scratch Built Consolidated XF-92A | Parked | 14-Feb-15 14:21 | 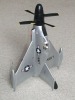 | | Views : 518 | | This is not the Consolidated XF-92A, but it is an X plane and this was the closest existing aircraft name I could find on Virtual Aerodrome.com. For something quick and fun, Iput together this 1/48 scale plastic Lindberg kit of a XFY-1 VTO Pogo |
| rayl | Scratch Built Consolidated XF-92A | Build | 13-Feb-15 12:51 | 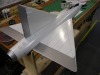 | | Views : 518 | | Started to lay out the panel lines. I bought a cheezy set of Rapiograph-type draughtsman felt tip pens at the local Hobby Lobby. They don't work to well on a glossy surface so I treid wiping the paint job down with denatured alchohol to erase the mistakes, which worked (sort of). The alchohol did act like a weak de-glosser and the next attempt worked better. I think that being it's Friday the 13th today, I shall find something else to do before I muck this thing up really bad. |
| rayl | Scratch Built Consolidated XF-92A | Build | 13-Feb-15 12:43 | 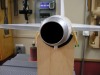 | | Views : 435 | | Done with this end. |
|
| Hangar |
Aircraft |
Category |
Date |
Preview |
| rayl | Scratch Built Consolidated XF-92A | Parked | 13-Feb-15 12:42 | 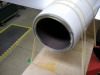 | | Views : 419 | | A/B duct installed. Two rings of soft solder CA'd to the former to provide gluing surface for the A/B nozzles and the plastic (ex-coke bottle) tail-piece fairing. |
| rayl | Scratch Built Consolidated XF-92A | Build | 13-Feb-15 12:38 | 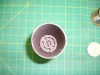 | | Views : 392 | | THis is the Afterburne exhaust. I used the "Paint" program to print out a mottled sheet to simulate the exhaust. The flame-holder rings are cardboard and Basswood sticks painted with cheap acyrlics ($0.50 @) from wallyworld. |
| rayl | Scratch Built Consolidated XF-92A | Build | 09-Feb-15 10:27 |  | | Views : 522 | | Here is the first test fit; not bad. I will CA a ring of fine solder to the small end to ensure that it remains circular and give it a little strength. |
| rayl | Scratch Built Consolidated XF-92A | Build | 09-Feb-15 10:25 | 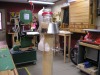 | | Views : 496 | | All shrunk down and ready to trim it out. |
| rayl | Scratch Built Consolidated XF-92A | Build | 09-Feb-15 10:24 | 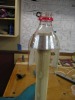 | | Views : 406 | | I had a little time in the shop yesterday while the LOML was shopping, so I thought that I would do another "Shrinky-Dink' for the Afterburner tail piece. Here is the portion of the Coke bottle over the form before applying heat to it. |
| rayl | Scratch Built Consolidated XF-92A | Build | 07-Feb-15 13:40 | 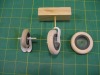 | | Views : 482 | | Dosen't look like a full 2 days work does it? BTW; when I said that I was machining the parts, it was all done with standard, i.e. full size, turning gouges and machinist files to work down to the final size. |
|
