| Hangar |
Aircraft |
Category |
Date |
Preview |
| LASTWOODSMAN | Herr Engineering HRR 105, Fokker D-7 | Parked | 05-Oct-17 21:33 | 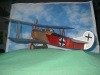 | | Views : 608 | | And, it is rubber powered for Free Flight (even though I think it is way too heavy) - I am almost afraid to weight it and calculate the wing loading - under 0.5 grams per square inch of wings SHOULD fly ... |
| LASTWOODSMAN | Herr Engineering HRR 105, Fokker D-7 | Parked | 05-Oct-17 21:30 | 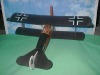 | | Views : 580 | | I dusted it all off, and it is now ready for the Model Show on Oct 14, 2017 at the Historic Hangar at Windsor Airport. |
| LASTWOODSMAN | Herr Engineering HRR 105, Fokker D-7 | Parked | 05-Oct-17 21:28 | 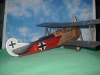 | | Views : 554 | | I put in the new pilot and added the cockpit combing. |
| LASTWOODSMAN | Herr Engineering HRR 105, Fokker D-7 | Parked | 05-Oct-17 21:27 | 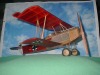 | | Views : 574 | | It has a new scaled-down photocopy of an instrument panel. |
| LASTWOODSMAN | Herr Engineering HRR 105, Fokker D-7 | Parked | 05-Oct-17 21:24 |  | | Views : 564 | | It has the new (and long time coming), scale, laminated "AXIAL" prop and hub - my best effort - it is a little too large and thick, but better than too small ... |
| LASTWOODSMAN | Herr Engineering HRR 105, Fokker D-7 | Parked | 05-Oct-17 21:21 | 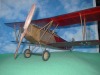 | | Views : 577 | | Well, it is finally all done - my Thomas Herr designed "FOKKER D7" WW1 German biplane fighter - arguably the BEST fighter of WW1. |
|
| Hangar |
Aircraft |
Category |
Date |
Preview |
| LASTWOODSMAN | Herr Engineering HRR 105, Fokker D-7 | Parked | 03-Oct-17 22:27 | 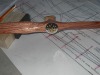 | | Views : 530 | | Closeup of the two sizes, and two colors, of bolt heads on the two bolt circles on the prop hub, with one dressmaker's pin in the middle of the hub. The bolt heads are not exactly perfectly located, but, it was the best I could do. |
| LASTWOODSMAN | Herr Engineering HRR 105, Fokker D-7 | Parked | 03-Oct-17 22:23 | 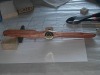 | | Views : 582 | | Here is the finished prop, with that 90 degree bend of the prop shaft glued into the recessed trough in the propeller face behind the prop hub, and the removeable nose block, all assembled to the prop. |
| LASTWOODSMAN | Herr Engineering HRR 105, Fokker D-7 | Parked | 03-Oct-17 22:12 | 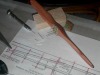 | | Views : 572 | | Here I started putting in the silver smaller Dressmaker's pins. I centered the hub with a pin in the middle and then 2 more pins. I then drilled small 0.025" holes through the hub holes and into the prop wood, but not too far. Then I cut the pins short so as not to go through the other side of the prop. Then I used needle nose plliers to start inserting the 0.023" diam pins into the predrilled holes, then pushed the heads of the pins down the rest of the way, even with the hub face. I did not even need to use any glue - the last part of the pin shafts went through undrilled balsa. |
| LASTWOODSMAN | Herr Engineering HRR 105, Fokker D-7 | Parked | 03-Oct-17 11:08 | 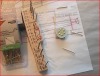 | | Views : 555 | | Six large bolt heads are in, and six smaller bolt heads to go. Starting to look like a prop hub! |
| LASTWOODSMAN | Herr Engineering HRR 105, Fokker D-7 | Parked | 03-Oct-17 11:05 | 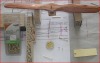 | | Views : 548 | | Here I have started to put in the larger brass coated Escutcheon pin heads into the prop hub to simulate bolt heads. I used side cutter pliers to snip off the shaft below the head, to just under 1/16" length so that they would not protrude past the 1/16" balsa plate of the hub. I made a little tool, at the bottom right, from a piece of file folder cardboard. I cut a little slot in the cardboard for the short pin shaft to sit in, with the head of the pin sitting on top of the file folder cardboard. I held the cardboard, lining the pin head up with the hole in the prop hub, then pressed on the head to push the short shaft into the hole, and then slid the cardboard out. It was a snug fit and i didn't even need any glue. |
| LASTWOODSMAN | Herr Engineering HRR 105, Fokker D-7 | Parked | 02-Oct-17 15:47 | 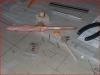 | | Views : 534 | | The 90 degree bend at the tip of the prop shaft, will sit inside the small, recessed, groove slot trough. I made this trough using a steel ruler and the sideways tip of an awl, to push this trough into the balsa, at the front of the prop face, and going sideways for 6 mm from the prop shaft center. It will be glued in there deep enough, with 5 min Epoxy, in order to keep the front prop face flat, in order to receive the flat of the new prop hub. |
|
