| Build Thread, Page :
[ 1 ] 2 3 4 5 6 7 8 9 10 (185 posts, 20 posts per page, 10 pages in total)
|
[ Next > ] |
| LASTWOODSMAN, Comment for image # 38396 | 25 Apr 17 10:15 |
| Heywood - when you get that 24" Dumas kit, would you please post pics of the kit contents AND the plan sheets - eager to see if the plans have the 3D ISO drawings of completed frameworks of wings, fuse, stab, rudder like on my Spad 7. Also, Dumas now ships clear canopies with a protective blue film that you have to peel off. You have great enthusiasm. I have never completed a scratch build also - got bogged down pretty quick on my Curtiss Pusher. |
| heywooood, Comment for image # 38396 | 25 Apr 17 09:38 |
| yeah - its a tricky little 'clam shell' kind of arrangement.
The Super has the benefit of solid doors (from a modelers perspective) as opposed to the earlier Solution with its plexiglass cockpit doors. Your 'solution' was probably the best way to go I think. It worked, and your comparison photo of your model to the original positioned on the tail stand prove it. Nicely done. |
| Don C, Comment for image # 38396 | 25 Apr 17 08:58 |
| That 3 piece canopy was one of the hardest parts of the build. Finally got some thin plastic and glued it in place. |
| heywooood, Comment for image # 38145 | 25 Apr 17 00:33 |
| It really is a terrific model - I have yet to scratch build anything. 'Flying motor' is right..all of these early racers were just 'buy the biggest engine and then make a tiny plane around it with barely any room for a pilot and enough juice to fly for a half hour' - these guys were just bananas |
| heywooood, Comment for image # 38396 | 24 Apr 17 23:48 |
| I'm curious about how Dumas provides this canopy part. Will it be something I can 'cut up'? I had planned to model the plane 'in flight' as it were - with the pilot installed and the canopy all buttoned up. But I sure would like to maybe do a little more with this one - I guess we'll see |
| heywooood, Comment for image # 38396 | 24 Apr 17 23:46 |
| this picture also shows the simple rolled steel (or alum) rails that the upper canopy slides on..the base looks like kind of a tray. |
| heywooood, Comment for image # 38396 | 24 Apr 17 23:12 |
| right - that's what the two tubular openings in the upper wing are for - the intakes for those two vents. Thanks for posting this photo! |
| Don C, Comment for image # 38396 | 24 Apr 17 18:42 |
| They thought that it was for the Solution, but the 2 vents a the top were an improvement to get fresh air (no exhaust) in the cockpit of the Super S as Holman just about passed out 2-3 times from fumes during the '30 Thompson Race. |
| Don C, Image # 38396 | 24 Apr 17 18:37 |
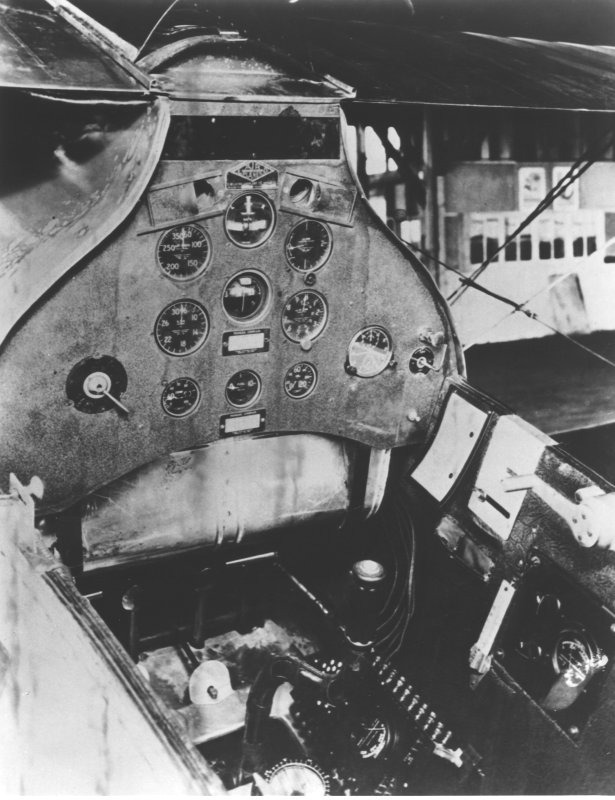
Heywooood, here's a picture of the panel for the Super Solution I got from the museum. |
| Don C, Comment for image # 38142 | 31 Mar 17 15:39 |
| Thanks Mr. O. Huey, there's a picture of the prop before assembly on page 4 of the build thread. I used a Cleveland plan. They have pretty good scale drawings for things. I'll try to keep it short. 1/16 scale. 3/8" dowel. Used the drill press for crankshaft hole and lengthwise hole(1/8")for props. Took a few tries to get them correct. Hub is 1' long. Left extra inch on end to put in chuck. Now it is a "vertical mill". Needle files and sandpaper to shape. The extra on the ends is then sanded off on either belt or disc sander. File a small flat on one side of crankshaft hole and glue a short piece of brass tube for the large ring. Crankshaft is end of an "Oshust" bearing. Mr. O diagrammed that in one of his builds. I copied it because it works well and is easy. Ask if I didn't explain well enough. |
| John M Oshust, Comment for image # 38142 | 31 Mar 17 13:51 |
| Great photo. Nice model,, |
| Huey V77, Comment for image # 38142 | 31 Mar 17 13:28 |
| Don, old buddy old pal, how can I get a copy of your prop hub? Its perfect for the Gee Bee. |
| Skyediamonds1985, Comment for image # 38170 | 24 Mar 17 14:19 |
| Don C, thank you for that info on the rigging. Huey, your eyes are much better than mine. |
| Don C, Comment for image # 38170 | 23 Mar 17 21:08 |
| Thanks Skye - Plastruct flat styrene strips, don't remember the size, 1/16 maybe, painted silver. Clevises are silver beads and tubes. |
| Huey V77, Comment for image # 38170 | 23 Mar 17 18:49 |
| Skye, the windshield frame. |
| lukebozek1, Comment for image # 38170 | 23 Mar 17 16:32 |
| It's right next to Bradley Intl. Airport and has two buildings, one for military and one for commercial. Their exhibits are first class, and they have projects going all the time. I sat in a Corsair and a Thunderbolt with some students I brought down. Worth a trip. |
| Skyediamonds1985, Comment for image # 38170 | 23 Mar 17 15:15 |
| DonC, what method was used for rigging? Which materials? Looks fantastic with that flat rigging. What did you use for clevis ends to anchor the rigging? Your model looks great. Huey, how could you possibly tell that was a Lockheed Model 12 in the background? -Skye |
| Huey V77, Comment for image # 38170 | 22 Mar 17 18:20 |
| The Blimp and the Lockheed 12 look interesting . |
| Huey V77, Comment for image # 38170 | 22 Mar 17 18:04 |
| Looks like a great museum. |
| Don C, Comment for image # 38170 | 22 Mar 17 15:26 |
| Unfortunately my decal didn't turn out that well. I think I should have used decal paper with white background. |
| Build Thread, Page :
[ 1 ] 2 3 4 5 6 7 8 9 10 (185 posts, 20 posts per page, 10 pages in total)
|
[ Next > ] |
