| Hangar |
Aircraft |
Category |
Date |
Preview |
| Skyediamonds1985 | Guillows Series 200 - SE5a | Build | 11-Sep-16 21:34 | 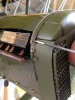 |
| Views : 829 |
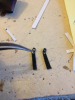
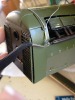
| Close up photos of the real plane revealed the radiator had a strap that was tied down with a cable. Used the pin to help glue on the edge of the strap. |
| Skyediamonds1985 | Guillows Series 200 - SE5a | Build | 11-Sep-16 21:33 |  |
| Views : 799 |
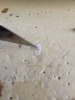
| Added some super glue to a pin so I could exercise better control where it wanted it to go. |
| Skyediamonds1985 | Guillows Series 200 - SE5a | Build | 11-Sep-16 13:59 |  |
| Views : 950 |
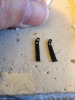
| Forgot to show how I approached the detailing of the top portion of the radiator. I just used Spacklin Compound. This is in its rough shape just after I pulled off the masking tape while it was still wet. |
| Skyediamonds1985 | Guillows Series 200 - SE5a | Build | 11-Sep-16 13:53 | 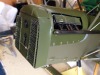 |
| Views : 855 |
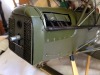
| The bottom of the radiator cover has been glued to the underside of the fuselage and top has been painted. Only to add just a few more accessories and this will be finished and I'll move onto the tail feathers. |
| Skyediamonds1985 | Guillows Series 200 - SE5a | Build | 10-Sep-16 13:31 | 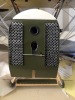 |
| Views : 860 |
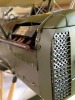
| All the louvers are glued in place along with the small "adjusting" rod and, if you look closely, can see a very fine wire wrapped around the wheel. Sorry about not having the louvers adjustable. It actually occurred to me to try making them adjustable, but reality hit me. I had to keep in mind, "This is only a small stick-n-tissue model." I'm currently having some problems with my ol' laptap. I've taken additional pictures, but can't seem to get them resized into my folder for future submission to this site. I'll keep trying. I sincerely thank everyone for their inputs. I've posted my response in my last post on the 6th. You guys are great. |
| Skyediamonds1985 | Guillows Series 200 - SE5a | Build | 04-Sep-16 17:51 | 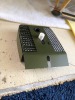 |
| Views : 892 |
| However, when viewed from an angle, the louvers are very prominent. I could've arranged the louvers to cant downward to visually bring them out. Since this model will be given to my daughter, I have no idea where she'll be displaying it. So, decided a neutral position would be best. |