| Hangar |
Aircraft |
Category |
Date |
Preview |
| Skyediamonds1985 | Guillows Series 200 - SE5a | Build | 24-Jul-16 16:31 | 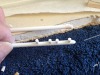 |
| Views : 828 |
| Super glued and starting to take shape |
| Skyediamonds1985 | Guillows Series 200 - SE5a | Build | 24-Jul-16 16:30 |  |
| Views : 879 |
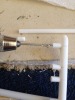
| Cutting short lengths of smaller sized plastic tubing to attach the manifold to the engine. If you can zoom up, the small piece already cut has been filed round to help fit to the larger plastic tubing. |
| Skyediamonds1985 | Guillows Series 200 - SE5a | Build | 24-Jul-16 16:28 | 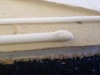 |
| Views : 830 |
| For exhaust manifold, the S.E. 5 has a prominent feature. Cut a length of suitable sized plastic tubing and covered the end with Spackling compound. |
| Skyediamonds1985 | Guillows Series 200 - SE5a | Build | 14-Jul-16 15:29 | 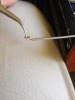 |
| Views : 822 |
| Here, you can see that the (now) reduced size can easily fit inside the tubular bead. But in order to make room for the "holding wire" coming out of the struts, I had to cut off much of the end of the plastic. As you can see from comparing the length of the bead and allowances for both the plastic and wire, doesn't really give much strength to this joint. As all things in life, one must consider giving up something in order to gain a desired goal. So the rigging is obviously non-functional and somewhat weak in exchange for the convenience of being able to attch the ends of the rigging and slide them in adjusting tension. |
| Skyediamonds1985 | Guillows Series 200 - SE5a | Build | 14-Jul-16 15:22 | 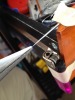 |
| Views : 862 |
| Despite the seemingly tiny cross section of the half-round plastic strips used for rigging, it was still too large to fit over the small beads used as turnbuckles. To use larger beads would have made everything out of scale. To reduce the cross section, I used heat to stretch out the ends . The lighter was taped for photographic purposes. |
| Skyediamonds1985 | Guillows Series 200 - SE5a | Build | 14-Jul-16 15:15 |  |
| Views : 840 |
|