| Hangar |
Aircraft |
Category |
Date |
Preview |
| kenm94591 | Dumas Kit #223, P-26 Peashooter | Parked | 16-Mar-19 20:47 | 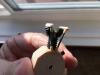 | | Views : 890 | | This is a very rough protopye to check the look and build of one of the nine cylinders or the Wasp engine. The "crankcase" is one inch in diameter with nine flats for each of the cylinders. Start by drilling a hole and inserting small bamboo rod and then inserting a small piece of coffee stirrer over that. The set screw is then glued in place and the other two set screws are glued to the cylinder. Half round styrene rod is uesd for the headers. 3/64" carbon steel music rod is used for the push rods. Will not be using that on the actual build. 3/16" strips of masking tape is used at the top and bottom of the push rods to replicate the connectors to the crankcase and headers. Masking tape will not be used for final motor. I am having trouble trying to build the spark plugs as they are 1/16" long and 1/64" round. |
| David Duckett | Dumas Kit #501, F4D Phantom | Reference | 15-Mar-19 18:42 |  | | Views : 1045 | | I think I've died and gone to modeling Heaven. A question for RayL: What do I need to apply the Glue? I have Plastruct Plastic Weld with a brush applicator but I know there must be a better way. |
| David Duckett | Dumas Kit #501, F4D Phantom | Reference | 15-Mar-19 18:37 |  | | Views : 934 | | More snow last Tuesday |
| David Duckett | Dumas Kit #501, F4D Phantom | Build | 15-Mar-19 18:36 |  | | Views : 888 | | The DD Dumas & Diels aircraft Manufacturing Company, Limited |
| kenm94591 | Dumas Kit #223, P-26 Peashooter | Parked | 15-Mar-19 16:56 | 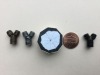 | | Views : 923 | | So my wife dug out the scroll saw and rough cut the crank case for the P-26. She then filed everything down to just above the black line (note to self - basswood is hard). jBecause of my eyesight and shakey hands my wife helped. Now I have to sand down to the black line. Not sure which color to use for the engine. Left to right I have brass, steel or black. |
| Don C | Todays Hobbies F-16a Falcon | Parked | 15-Mar-19 14:15 |  | | Views : 4433 | | Next. I'm leaning towards the P6E. |
|
| Hangar |
Aircraft |
Category |
Date |
Preview |
| Don C | Todays Hobbies F-16a Falcon | Parked | 15-Mar-19 14:13 |  | | Views : 4502 | | Here's the best one I found showing those humps.that's it. On the shelf now. |
| Don C | Todays Hobbies F-16a Falcon | Parked | 15-Mar-19 14:11 |  | | Views : 4470 | |
| Don C | Todays Hobbies F-16a Falcon | Parked | 15-Mar-19 14:11 |  | | Views : 4293 | |
| Don C | Todays Hobbies F-16a Falcon | Parked | 15-Mar-19 14:06 |  | | Views : 4335 | | Finally complete. So here are some baby pics. Color is best outside, but it's hard to get a clean background. |
| edtherenderman | West Wings Hawker Sea Fury FB11 | Parked | 15-Mar-19 09:03 |  | | Views : 3624 | | I didn’t like the decals in the kit, so I created my own using a ink jet printer and water slide decal inkjet paper. All you need to do is print the decal on the paper, then overspray the decal with a thin coat of clear enamel. Then apply like any other water slide decal. Once the decals had set, I sprayed them with mat clear. |
| edtherenderman | West Wings Hawker Sea Fury FB11 | Parked | 15-Mar-19 08:59 |  | | Views : 3611 | | The model is covered in Top Flight Silk Span and doped with Eze Dope. Love the water soluble dope. So much easier to work with then the old Hot Fuel Proof dopes I used in the past! I used Vallejo Acrylic paints with an airbrush, and a fine drafting pen for panel lines. |
|
