| Hangar |
Aircraft |
Category |
Date |
Preview |
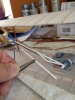
| TJH | Easy Built FF-52 Taylorcraft | Build | 30-Jun-15 20:54 |  |
| Views : 1104 |
| Final prep of miscellaneous parts before tissue. Only painting on this airplane is the wing struts and wheels. |
| Skyediamonds1985 | Guillows 1903 Wright Flyer | Parked | 30-Jun-15 20:48 |  |
| Views : 6459 |
| There you have it. I might add I installed the engine cooling tubes just prior to installing the front elevator assembly. |
| Skyediamonds1985 | Guillows 1903 Wright Flyer | Build | 30-Jun-15 20:39 |  |
| Views : 6320 |
| With most of the rigging complete, the rear struts were finally installed and the rear portion of the rigging complete. I might add that the wing-warping rigging is confined to the two outer most rear struts only. |
| Skyediamonds1985 | Guillows 1903 Wright Flyer | Build | 30-Jun-15 20:32 |  |
| Views : 5493 |
| Its only after the wing-warping and internal rigging is complete, when the "outside" rigging is started. Note the fuel line being routed around the struts to the tank. Some pictures show the fuel line hanging off the leading edge, some pictures show it to be more tight. It was just an arbitrary decision on my part. Just seemed to "look right." |
| Skyediamonds1985 | Guillows 1903 Wright Flyer | Build | 30-Jun-15 20:24 |  |
| Views : 5243 |
| With the wing-warping complete, now starting on the internal rigging (called longitudinal, according to the blue prints) |
| Skyediamonds1985 | Guillows 1903 Wright Flyer | Build | 30-Jun-15 20:08 |  |
| Views : 5446 |
| This is the underside of the top wing. The wing warping rigging is complete. No other rigging is (yet) installed and lack of the remaining rear struts helps me to get my hands inside. |