| Hangar |
Aircraft |
Category |
Date |
Preview |
| David Duckett | Dave Diels Engineering, Inc Kit #19, Focke-Wulf Ta 152H | Build | 18-Nov-15 04:50 |  | | Views : 1044 | | Fabricating the prop |
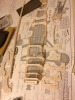
| Skyediamonds1985 | Guillows Series 200 - SE5a | Build | 17-Nov-15 19:37 | 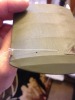 | | Views : 960 | | Here is a another perspective of the difference between the two holes. The rear is where the thread would naturally "flow" in a straight line to the "hidden pulley" inside the wing. The other hole, whereas not as natural, comes more close to resembling the details of the real aircraft. The control horn in this picture is only a representation to help give me an idea of where to puncture the hole through the covering. Only get one shot at this, might as well do a couple of "dress rehearsals" first on my practice wing. |
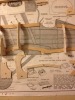
| Skyediamonds1985 | Guillows Series 200 - SE5a | Build | 17-Nov-15 19:32 | 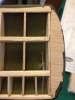 | | Views : 964 | | This is the underside of my faux sample wing where the aileron "cable" runs through. The hole nearest the rear spar is where the "cable" runs naturally through in a straight line. The second hole where the thread is coming through is the hole that more closely resembles the actual aircraft. Not totally accurate, but better than the original point of entry near the rear spar. |
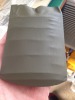
| Skyediamonds1985 | Guillows Series 200 - SE5a | Build | 17-Nov-15 19:29 | 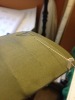 | | Views : 963 | | As with almost anything in life of modeling, adding some special detailing oftentimes comes with additional work not anticipated. Such as it is with my intentions to add the inspection window to the wing. I realize that for the window to have its true purpose, I needed to also add the pulley system inside the wing. In my previous posts, this was long accepted. What I overlooked, is that now I can only cover the (say for example) the top surface of the wing, then add the aileron rigging and pulley system, then I can cover the bottom wing. Just more fun-filled work. |
| John M Oshust | ManzanoLaser Royal Aircraft Factory B.E.12a | Parked | 17-Nov-15 17:31 |  | | Views : 4440 | | A very sad day here today. Mr. Bubz, my 12.5 year old Rhodesian Ridgeback, was put to sleep. There is a hole in my heart that will be very hard to fill. His nerves to the legs started to short out changing his once strong legs into noodles. God I loved this dog! |
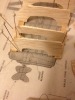
| Skyediamonds1985 | Guillows Series 200 - SE5a | Build | 17-Nov-15 15:43 | 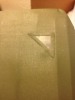 | | Views : 1023 | | My fourth try at installing the inspection window on the wing surface. Turned out, I only use glue. I thought if I used a heat iron on the strips of film would set off the adhesive and stick the whole assembly to the wing surface. I also thought an added "plus" would be that the additional heat from the iron would help tauten the wing surface further. What was happening, is due to the "hole" on the surface with no wooden support caused the surrounding opening and assembly to distort. In summary, the heat-shrink films are designed for covering a frame, not for supporting any assemblies, however small or light. |
|
|