| Hangar |
Aircraft |
Category |
Date |
Preview |
| edtherenderman | Aero-Werkes AW 11601 - Hannover CL IIIa | Build | 18-May-20 08:30 | 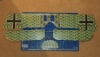 |
| Views : 321 |
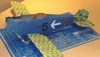
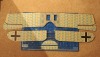
| Finished all the camo decals this weekend. Rib tapes are strips 1/16” wide cut from a large block of camo printed for that purpose. It took a LOT of time to do them! I could have faked them and just added them to the larger decals, but I was afraid it would be difficult to align them with the ribs, so I opted for this method. It actually worked better because I didn’t have to worry about being precise in decal placement, and I was able to cover the seams where I had to split the decals One lesson learned. Paint the entire model with white gloss instead of clear. Even printed on white background waterside paper, the decals are a little transparent and lose some vibrancy. Putting them on a white background would help a lot. There is still some touchup to do with paint, but I’m happy with the results. I couldn’t imagine trying to paint that many lozenges! |
| edtherenderman | Aero-Werkes AW 11601 - Hannover CL IIIa | Build | 12-May-20 21:52 |  |
| Views : 322 |
| And the Parabellum. This will have the round magazine attached with a short belt of rounds running from the mag into the receiver. If you look at the trigger and trigger guard, you can see the fine detail I can get with a 3D printer. |
| edtherenderman | Aero-Werkes AW 11601 - Hannover CL IIIa | Build | 12-May-20 21:50 | 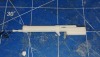 |
| Views : 371 |
| Close-up of Spandau machine gun. This is mounted in the right hand side upper fuse. It fire through the curve of the exhausts and is partially faired in by the cockpit combing and the engine cover. |
| edtherenderman | Aero-Werkes AW 11601 - Hannover CL IIIa | Build | 12-May-20 21:48 | 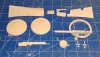 |
| Views : 345 |
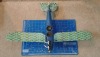
| I’ve also been busy modeling and 3D printing parts: The upper row are he engine covers. Left is on the left, right are the two pieces to the right and a small piece that goes in between Middle row: Wheels (printed halves and glued together), Observer gun ring with Parabellum machine gun and mount Bottom row: Spandau machine gun, round magazine for Parabellum, and two throttle quadrants I need to add inside the cockpit. |
| edtherenderman | Aero-Werkes AW 11601 - Hannover CL IIIa | Build | 12-May-20 21:44 | 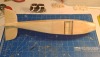 |
| Views : 383 |
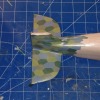
| Fuse underside |
| edtherenderman | Aero-Werkes AW 11601 - Hannover CL IIIa | Build | 12-May-20 21:44 |  |
| Views : 339 |
| Hay everyone. Sorry I’ve been off line for a while. Major long work days these last two week. Finally got some time to post. This is the Hannover fuse filled, covered with tissue, doped and a thick coat of gloss clear acrylic. I’m going to be applying lozenge camp decals to the back section (horizontal stab, fin and fuse) and wanted a good smooth base. |