| Hangar |
Aircraft |
Category |
Date |
Preview |
| edtherenderman | West Wings Hawker Tempest | Build | 12-Aug-19 08:49 | 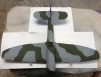 | | Views : 377 | | I then applied the J.A. Green after masking with blue tape. After pulling the tape, I found that I didn’t quite get all the gray on the model that I should have, so I went back and created tracing paper masks and resprayed the gray. Lesson learned here…paint the entire mode with the base color! It’s not light I’m flying this plane and need to save weight! I did get one advantage from this in that it created a soft edge between the two colors, which looks more realistic (to my eye) than the very hard edge of tape. I plan to “weather” this paint some, so I’m not worried about the inconsistent results as much as I would if this was just out of the paint barn. |
| edtherenderman | West Wings Hawker Tempest | Build | 12-Aug-19 08:44 | 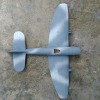 | | Views : 448 | | I found this site (http://www.hawkertempest.se/index.php/indetail/colours) that has the colors and the Federal Stock numbers for the Tempest. After going to my local Hobby store, I picked up some Tamiya Light Sea Gray (XF-25) and J.A. Green (XF-13) which appeared to be the closest matches. Probably not spot on, but will do for this application. I penciled in the outline of the camo and then I applied the Sea Gray over the top of Vallejo Base Gray primer. |
| edtherenderman | West Wings Hawker Tempest | Build | 31-Jul-19 15:37 | 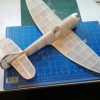 | | Views : 695 | | Note that fairings have been added. This was done with laser jet printer paper, attached with and covered by eze dope. |
| edtherenderman | West Wings Hawker Tempest | Build | 31-Jul-19 15:35 | 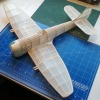 | | Views : 418 | |
| edtherenderman | West Wings Hawker Tempest | Build | 31-Jul-19 15:34 | 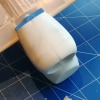 | | Views : 373 | |
| edtherenderman | West Wings Hawker Tempest | Build | 31-Jul-19 15:34 | 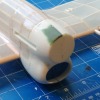 | | Views : 354 | |
|
| Hangar |
Aircraft |
Category |
Date |
Preview |
| edtherenderman | West Wings Hawker Tempest | Build | 31-Jul-19 15:33 | 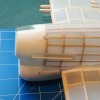 | | Views : 362 | |
| edtherenderman | West Wings Hawker Tempest | Build | 31-Jul-19 15:32 | 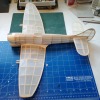 | | Views : 415 | |
| edtherenderman | West Wings Hawker Tempest | Build | 31-Jul-19 15:32 |  | | Views : 336 | | Note: Blue masking tape is to cover the radiator intake and exhaust as I was prepping to paint right before I took these pictures. |
| edtherenderman | West Wings Hawker Tempest | Build | 31-Jul-19 15:30 | 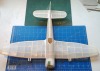 | | Views : 336 | | After cutting off the nose and radiator I originally built of balsa, I fitted the new printed pieces and replaced the tissue covering. Note that there is some green filler on the printed pieces. Because of shrinkage, the parts did not fit together a closely as I wanted, so some filling was necessary. |
| edtherenderman | West Wings Hawker Tempest | Build | 31-Jul-19 15:27 |  | | Views : 398 | | Here is where I changed my mind. I own a couple of 3D printers, and am very good at modeling in 3D software, so I decided to see if I could merge the two. Using as many reference images as I could find, I modeled the nose, radiator and exhausts in my software, then printed them out at very high resolution. This picture is of the cowling inside and out, but I also modeled and printed the radiator, air separator and air ducting to the carbs. |
| edtherenderman | West Wings Hawker Tempest | Build | 31-Jul-19 15:24 | 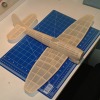 | | Views : 444 | |
|
