| Hangar |
Aircraft |
Category |
Date |
Preview |
| pfinn | Dumas Kit #220, Westland Lysander | Build | 24-Nov-09 02:06 | 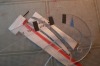 | | Views : 709 | | After I finished the last rib for the wing I thought I'd try some 220 grit paper to help hold the pieces while cutting. Helps alot. Phil. |
| pfinn | Dumas Kit #220, Westland Lysander | Build | 24-Nov-09 01:59 |  | | Views : 681 | | And there you have it. A scrap rib with a too thick trailing edge. That always seems to happen when someone's watching...sheesh! But you get the picture. I hope. |
| pfinn | Dumas Kit #220, Westland Lysander | Build | 24-Nov-09 01:53 | 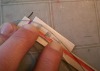 | | Views : 697 | | Snug blank back in place leaving remnant in place for support. Repeat process with top surface curve. Use Leading edge thickness for front curve position (I positioned the jig stop corner for this height) and in this case I used a piece of 1/16" to indicate T.E. height. I moved and missed on this one! |
| pfinn | Dumas Kit #220, Westland Lysander | Build | 24-Nov-09 01:40 |  | | Views : 699 | | And carefully cut it. Don't remove remnant. |
| pfinn | Guillows Series 500 - BF 109 | Build | 24-Nov-09 01:37 | 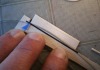 | | Views : 843 | | Cut bottom of rib profile first. Snug blank into jig. Line up indicated leading edge (blue arrow...which is the only constant point on all these ribs) and trailing edge through rear corner. |
| pfinn | Guillows Series 500 - BF 109 | Build | 24-Nov-09 01:29 | 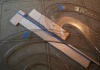 | | Views : 812 | | James, here's what I used to cut the ribs...this time. Fairly rudimentary. Two "Sweeps" or "French Curves" and a simple jig to hold the blank. Blue tape is for photo. It'll change color magically throughout this "How to"! |
|
| Hangar |
Aircraft |
Category |
Date |
Preview |
| pfinn | Dumas Kit #220, Westland Lysander | Build | 23-Nov-09 04:25 | 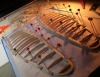 | | Views : 729 | | Ribs shaped . Nice thing with some good notching is the "Dry Fit" ability. Helps keep ya out of trouble when you don't have a clue what the heck you've gotta do next! ....Oh yeah, Sleep. |
| pfinn | Dumas Kit #220, Westland Lysander | Build | 23-Nov-09 04:17 | 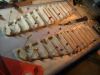 | | Views : 711 | | After notching the L.E and T.E. cut rib blanks. Most 1/32" and root, tip, and strut mount 1/16" hard(er) balsa. |
| pfinn | Dumas Kit #220, Westland Lysander | Build | 23-Nov-09 04:13 | 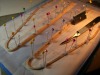 | | Views : 688 | | Down on the Parchment. Jonesd some of kfinn's pins. Kinda festive... |
| pfinn | Dumas Kit #220, Westland Lysander | Reference | 21-Nov-09 10:06 | 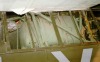 | | Views : 754 | | ML the "Will Be", This particular Lysander had a huge fuel tank mounted between the pilot and second seat position. Thought I might house the aileron servo in one of these, but it would definitely blow the entire "look" of the aircraft, so, I'll figure out something not too intrusive for the aileron linkage when I get there. Missed out on building yesterday cause it was our 10th Anniversary (me and wifey). Didn't think building would've been a very good idea! |
| pfinn | Dumas Kit #220, Westland Lysander | Reference | 21-Nov-09 09:54 | 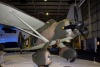 | | Views : 923 | | Mk III. RAF Museum, Hendon, London. Notice the propeller rotational direction. Bristol Mercury engine maybe mounted reversed as the exaust collector is the front ring of the nose cowl. What will those Brits think of next! |
| pfinn | Dumas Kit #220, Westland Lysander | Build | 19-Nov-09 17:35 | 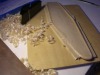 | | Views : 678 | | Shimmed the hoop with 1/8" Balsa and doublestick tape. Then just plane down the thickness. T.E to just over 1/16" at angle, and L.E. thickness taper from greatest chord point to inboard and tip. |
|
