| Hangar |
Aircraft |
Category |
Date |
Preview |
| edtherenderman | West Wings Hawker Tempest | Build | 31-Jul-19 15:34 | 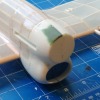 | | Views : 337 | |
| edtherenderman | West Wings Hawker Tempest | Build | 31-Jul-19 15:33 | 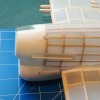 | | Views : 344 | |
| edtherenderman | West Wings Hawker Tempest | Build | 31-Jul-19 15:32 | 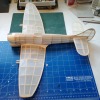 | | Views : 399 | |
| edtherenderman | West Wings Hawker Tempest | Build | 31-Jul-19 15:32 |  | | Views : 319 | | Note: Blue masking tape is to cover the radiator intake and exhaust as I was prepping to paint right before I took these pictures. |
| edtherenderman | West Wings Hawker Tempest | Build | 31-Jul-19 15:30 | 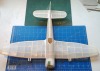 | | Views : 319 | | After cutting off the nose and radiator I originally built of balsa, I fitted the new printed pieces and replaced the tissue covering. Note that there is some green filler on the printed pieces. Because of shrinkage, the parts did not fit together a closely as I wanted, so some filling was necessary. |
| edtherenderman | West Wings Hawker Tempest | Build | 31-Jul-19 15:27 |  | | Views : 378 | | Here is where I changed my mind. I own a couple of 3D printers, and am very good at modeling in 3D software, so I decided to see if I could merge the two. Using as many reference images as I could find, I modeled the nose, radiator and exhausts in my software, then printed them out at very high resolution. This picture is of the cowling inside and out, but I also modeled and printed the radiator, air separator and air ducting to the carbs. |
|
| Hangar |
Aircraft |
Category |
Date |
Preview |
| edtherenderman | West Wings Hawker Tempest | Build | 31-Jul-19 15:24 | 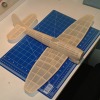 | | Views : 424 | |
| edtherenderman | West Wings Hawker Tempest | Build | 31-Jul-19 15:23 |  | | Views : 360 | | Aircraft assembled without fairings |
| edtherenderman | West Wings Hawker Tempest | Build | 31-Jul-19 15:21 |  | | Views : 339 | | Aircraft after covering. I used the same materials to cover this as I did my Sea Fury; Top Flight Silk Span and doped with Eze Dope. |
| edtherenderman | West Wings Hawker Tempest | Build | 31-Jul-19 15:18 | 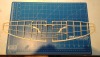 | | Views : 309 | | Top of wing. Standard construction techniques. One center section, and two wing outer sections with dihedral on the rib where landing gear attaches. Very straight forward construction. |
| edtherenderman | West Wings Hawker Tempest | Build | 31-Jul-19 15:16 |  | | Views : 313 | | Rudder/Fin and Elevator/Stabilizer. The plans call for a single 1/16” layer, but I built up the surfaces to give them a more scale look. |
| edtherenderman | West Wings Hawker Tempest | Build | 31-Jul-19 15:14 | 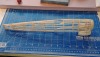 | | Views : 371 | | Fuse built. Standard construction technique with one half of the fuse on a board, laying up ribs and stringers, then removing and doing the other half. Radiator and front engine cowling is shaped balsa blocks. Note that the bottom of fuse is not completed until wing is attached. |
|
