| Hangar |
Aircraft |
Category |
Date |
Preview |
| Skyediamonds1985 | Guillows Series 200 - SE5a | Parked | 28-Jan-16 17:45 | 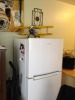 |
| Views : 658 |
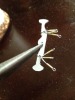
| This is for Rayl. My first display stand for the PT-17 was slightly modified as a refrigerator. Making use of small space. |
| Skyediamonds1985 | Guillows Series 200 - SE5a | Build | 26-Jan-16 23:41 | 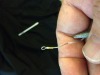 |
| Views : 654 |
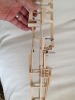
| Here's the (semi) finished turnbuckle being held by hand to help lend itself to the scale desired. I'll be using the open end to wire to the rudder bar. I could also twist the open end to form a closed turnbuckle. I borrowed this idea from one of the many modeling techniques shown on YouTube. |
| Skyediamonds1985 | Guillows Series 200 - SE5a | Build | 26-Jan-16 23:38 | 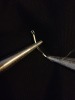 |
| Views : 623 |
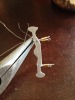
| Taking one needle nose pliers and carefully clasping it at the end of the small tube, so as to not crush it, I then used the other needle nose pliers to help pull the tube such that the wired loop closed down to a more realistic scale. This is one end of the "turnbuckle." I'll be using the other end to fasten to the rudder bar |
| Skyediamonds1985 | Guillows Series 200 - SE5a | Build | 26-Jan-16 23:27 |  |
| Views : 595 |
| As in most (if not all) biplanes and older types, there are turnbuckles. Since there are no commercially available turnbuckles in the modeling world needed this scale of 1/20th, I decided to fabricate my own. I simply used very tiny tubes purchased from a local arts and crafts store (Hobby Lobby) and threaded 28 gauge wire through and looped back out the other end. |
| Skyediamonds1985 | Guillows Series 200 - SE5a | Build | 26-Jan-16 23:22 | 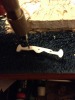 |
| Views : 565 |
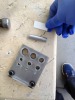
| I cut up two pieces of plastic from discarded credit cards and laminated them together to form the rudder bar. I'm now drilling holes for the cables that will l(simulate) lead to the rudder. |
| Skyediamonds1985 | Guillows Series 200 - SE5a | Parked | 26-Jan-16 23:19 |  |
| Views : 600 |
| As everyone has at one time or another shared their workshop or home with our fellow VA members, thought I'd allow all to see my (truly) humble abode which consists of my little corner used as a workshop in our equally little one-room apartment. Considering my limitations on tools, accessories, and space to work, one can appreciate the old adage "Wherever there's a will, there's a way" to build models. |