| Hangar |
Aircraft |
Category |
Date |
Preview |
| edtherenderman | West Wings Hawker Tempest | Parked | 04-Nov-19 14:50 | 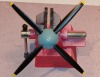 | | Views : 604 | | The finished product! |
| edtherenderman | West Wings Hawker Tempest | Build | 04-Nov-19 14:49 |  | | Views : 563 | | I painted the parts separately. For the blades, I painted a gray primer and then painted the yellow on that. After it dried, I masked it and painted the black. Results are pretty good. I painted all the parts with Krylon satin finish to replicate the look of the rest of the airplane. |
| edtherenderman | West Wings Hawker Tempest | Build | 04-Nov-19 14:47 | 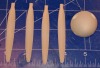 | | Views : 574 | | Here are the parts after removal from the support material and a light sanding and fitting. |
| edtherenderman | West Wings Hawker Tempest | Build | 04-Nov-19 14:46 |  | | Views : 660 | | Like the nose and exhaust, I decided to model and print the propeller and spinner using my 3D modeling tools and 3D printer. Here is a picture of the propeller blades still attached to their supports and on the build platform. I had already printed the spinner in another batch with propeller blades that I didn’t like the shape of. These are the updated version. |
| edtherenderman | West Wings Hawker Tempest | Build | 14-Oct-19 09:04 |  | | Views : 363 | |
| edtherenderman | West Wings Hawker Tempest | Build | 14-Oct-19 09:04 | 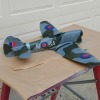 | | Views : 408 | |
|
| Hangar |
Aircraft |
Category |
Date |
Preview |
| edtherenderman | West Wings Hawker Tempest | Build | 14-Oct-19 09:03 |  | | Views : 364 | |
| edtherenderman | West Wings Hawker Tempest | Build | 14-Oct-19 09:03 | 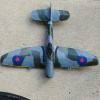 | | Views : 323 | |
| edtherenderman | West Wings Hawker Tempest | Build | 14-Oct-19 09:02 |  | | Views : 361 | | I haven’t posted much recently on the Tempest. Nice summer weather in the Pacific NW has kept me outside most of the summer, but now that things are turning wet again, back to inside hobbies! Since I last posted, I finished painting the Identification Stipes, decals, and panel lines. The decals were a pain. I tried to use the decals in the kit but they were just too then and old. So I created my own decals in PhotoShop and printed them out on waterslide inkjet paper. Much better results! When I put decals down, I spray the surface with gloss to give it a good surface to adhere to, then overspray with flat. I tried using Tamiya clear for the overspray and it really messed up the finish. Not sure if it reacted with the paint below, or something else, but it was a mess. So reading how many of you finish your models, I decided to overspray the top and sides (left the bottom flat) with a Krylon Satin finish. It’s an interesting effect. I’m not sure I like it as much on a stick and tissue model because it accentuates all he stringers. But I can see this being really good looking on a model that have been filled in. I’m going to leave it like this for now. Panel lines were done with black or gray colored felt tip drafting pens. Usually 0.3 or 0.1. I created templates from paper for the Gear doors, elevator, ailerons, rudder and flaps so that they are consistent. Next is to finish the propeller (I’ll post that journey soon!), attaching the canopy, and weathering. |
| edtherenderman | West Wings Hawker Tempest | Build | 12-Aug-19 08:58 | 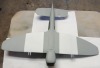 | | Views : 398 | | Also put the base coat of Testers flat white latex enamel for the identification strips. This isn’t a D-Day aircraft. Starting in summer of 1944, to make this aircraft (also Typhoons) easier for ground defenses to identify, white and black strips where painted on the bottoms of the wings in a white, black white, black, white pattern. |
| edtherenderman | West Wings Hawker Tempest | Build | 12-Aug-19 08:50 |  | | Views : 478 | | Starboard view |
| edtherenderman | West Wings Hawker Tempest | Build | 12-Aug-19 08:49 |  | | Views : 378 | | Port side view |
|
