| Hangar |
Aircraft |
Category |
Date |
Preview |
| edtherenderman | Cleveland Westland Whirlwind | Build | 13-Mar-22 18:28 |  |
| Views : 188 |
| Gear partially retracted. |
| edtherenderman | Cleveland Westland Whirlwind | Build | 13-Mar-22 18:28 | 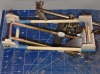 |
| Views : 181 |
| Gear fully down from the top as if looking into the engine nacelle. |
| edtherenderman | Cleveland Westland Whirlwind | Build | 13-Mar-22 18:27 |  |
| Views : 177 |
| The landing gear is another engineering challenge. I was able to find an original drawing of the landing gear configuration, which was really helpful. I didn’t understand how the supporting struts worked until I found it. So I spend several evening trying to create the struts using brass and copper tubing, but realized I could 3D print them with enough detail and strength to work. I had already cut the gear doors out of one of the nacelles and was able to use that as a rig. After getting everything working, I created a test rig out of bamboo skewers for to build the other side. Here is the gear in fully down position. |
| edtherenderman | Cleveland Westland Whirlwind | Build | 25-Feb-22 14:37 |  |
| Views : 205 |
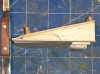
| Have also worked on 3D modeling the wheels and tires for the Whirlwind. I think these would work for a Mosquito too. They look very similar. This was done in blender and I will use my SLA Printer to print them as two halves. |
| edtherenderman | Cleveland Westland Whirlwind | Build | 25-Feb-22 14:35 | 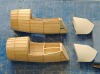 |
| Views : 243 |
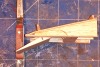
| Work is slow on the Whirlwind. I’ve been doing more 3D modeling to develop the ends of the engine nacelles. They are attached to the flaps and drop down with them, so I had to modify the model by added a new former to each nacelle and removing the ends. Now the plastic nacelle ends will meet right up with the rest of the nacelle when the flaps are close. I’m also working on infilling. This is by far the most tedious part of modeling! I love the finish, but really had the infill part. And, with such a big model and a fuse with two engine nacelles, there is a lot of infill! I’m going to need to build a WW1 model next just so I can get a break from infill! |
| edtherenderman | Cleveland Westland Whirlwind | Build | 06-Feb-22 15:05 | 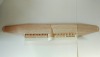 |
| Views : 204 |
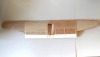
| Bottom view with flaps open. Note that the Whirlwind had flaps that went all the way across the wing and fuse, so there is a section on the fuse that drops too. |