| Hangar |
Aircraft |
Category |
Date |
Preview |
| Jastafuhrer 13 | Dumas Kit #222, Fokker EIII | Build | 29-Jan-14 13:50 | 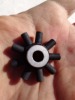 | | Views : 693 | | This is the best shot I could get off the cylinder fins. I think I need a phone with a better camera. |
| Jastafuhrer 13 | Dumas Kit #222, Fokker EIII | Build | 29-Jan-14 13:44 | 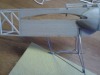 | | Views : 721 | | Test fitting the wing I ran into a problem. Former #3, which is the dash, hangs down into the hole and wetting ribs bump into it. Called Dumas and they admitted it was obviously a problem but they had never realized it before. Former#2 is flat on the bottom and forward of the leading edge. You could switch the two formers and probably be okay. Palerunner must have did this in his build because you can see they appear both ways in various build photos. I'll flatten it off and but another dash veneer on after the wing is in. I also asked Dumas about the lack of decalage in the stabilizer... Wing and stab are dead parallel. He said he'd add a degree of negative to the stab. I wonder if active there has actually built or flown this model. |
| Jastafuhrer 13 | Dumas Kit #222, Fokker EIII | Build | 29-Jan-14 13:33 | 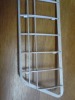 | | Views : 754 | | Downsized the rigging attachment blocks to 1/16 instead of 1/8. Beveled the top edges to hide under the tissue without lumps. Filed the holes as a groove on the side of the blocks before gluing. Drilled with #80 bit after. |
| Jastafuhrer 13 | Dumas Kit #222, Fokker EIII | Build | 29-Jan-14 13:29 | 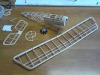 | | Views : 692 | | Wing is almost finished. Still need to shape the trailing edge. |
| Jastafuhrer 13 | Dumas Kit #222, Fokker EIII | Build | 29-Jan-14 13:25 | 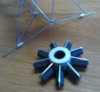 | | Views : 748 | | Black crankcase, grey cylinders, aluminum cam case, paperclip pushrods for contrast. Also wrapped and soldered the landing gear. My old boy scout lashings came in handy. Tried to work out a pattern do the solder would make the joints look like forgings. |
| Jastafuhrer 13 | Dumas Kit #222, Fokker EIII | Build | 29-Jan-14 13:13 | 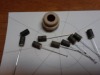 | | Views : 713 | | Working on the engine. Wrapped dowel cylinders with thread. Next time I'll find some thread that is less fuzzy. |
|
| Hangar |
Aircraft |
Category |
Date |
Preview |
| Jastafuhrer 13 | Dumas Kit #222, Fokker EIII | Build | 19-Jan-14 11:13 | 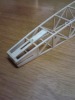 | | Views : 693 | | underside of the fuse tail. You can see where It got thin on the last cross piece when I was fitting the stab. I built it back up on the inside. |
| Jastafuhrer 13 | Dumas Kit #222, Fokker EIII | Build | 19-Jan-14 11:04 | 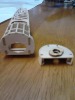 | | Views : 702 | | This Dumas kit has an interesting locking nose. It's hard to tell but I recut the fuselage sides to give 3 degrees downthrust per the Dumas instructions. I hardened the backside of the firewall and the tongue on the cowl with CA glue so it won't wear with flight. |
| Jastafuhrer 13 | Dumas Kit #222, Fokker EIII | Build | 19-Jan-14 10:59 | 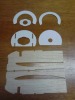 | | Views : 470 | | I've been making index card templates of all the pieces as I go to build the second plane. These fuselage pieces are the ones I cut. |
| Jastafuhrer 13 | Dumas Kit #222, Fokker EIII | Build | 19-Jan-14 10:56 | 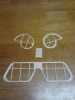 | | Views : 421 | | Stabilizer and rudder. The extra is laminated like pfinn did on his. I'm actual building two Eindeckers. One is almost straight from the kit. The other it's scratchbuilt in more of a scale display style. They piece in the middle is the bent piece under the cowl. |
| Jastafuhrer 13 | Dumas Kit #222, Fokker EIII | Build | 19-Jan-14 10:46 | 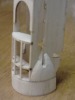 | | Views : 447 | | Another view of the cowl and fuselage front. |
| Jastafuhrer 13 | Dumas Kit #222, Fokker EIII | Build | 19-Jan-14 10:44 | 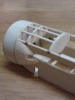 | | Views : 483 | | Here you can see that I've shaped the fairings behind the cowl. The picture quality isn't the greatest because it's s camera phone but you can see that I veneered the dash panel with 1/32 then sanded it down to ten thousandths before installing. I didn't want to see the end of the top stringers on the finished model. I have also sanded down all the burnt edges from the laser cuts for the same reason. It also trued up the edges because it appears the laser cuts with a slight angle. |
|
