| Hangar |
Aircraft |
Category |
Date |
Preview |
| Jastafuhrer 13 | Dumas Kit #222, Fokker EIII | Build | 29-Jan-14 13:25 | 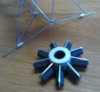 | | Views : 748 | | Black crankcase, grey cylinders, aluminum cam case, paperclip pushrods for contrast. Also wrapped and soldered the landing gear. My old boy scout lashings came in handy. Tried to work out a pattern do the solder would make the joints look like forgings. |
| Jastafuhrer 13 | Dumas Kit #222, Fokker EIII | Build | 29-Jan-14 13:13 | 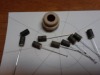 | | Views : 713 | | Working on the engine. Wrapped dowel cylinders with thread. Next time I'll find some thread that is less fuzzy. |
| Jastafuhrer 13 | Dumas Kit #222, Fokker EIII | Build | 19-Jan-14 11:13 | 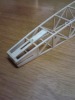 | | Views : 692 | | underside of the fuse tail. You can see where It got thin on the last cross piece when I was fitting the stab. I built it back up on the inside. |
| Jastafuhrer 13 | Dumas Kit #222, Fokker EIII | Build | 19-Jan-14 11:04 | 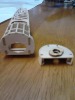 | | Views : 702 | | This Dumas kit has an interesting locking nose. It's hard to tell but I recut the fuselage sides to give 3 degrees downthrust per the Dumas instructions. I hardened the backside of the firewall and the tongue on the cowl with CA glue so it won't wear with flight. |
| Jastafuhrer 13 | Dumas Kit #222, Fokker EIII | Build | 19-Jan-14 10:59 | 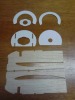 | | Views : 469 | | I've been making index card templates of all the pieces as I go to build the second plane. These fuselage pieces are the ones I cut. |
| Jastafuhrer 13 | Dumas Kit #222, Fokker EIII | Build | 19-Jan-14 10:56 | 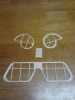 | | Views : 420 | | Stabilizer and rudder. The extra is laminated like pfinn did on his. I'm actual building two Eindeckers. One is almost straight from the kit. The other it's scratchbuilt in more of a scale display style. They piece in the middle is the bent piece under the cowl. |
|
| Hangar |
Aircraft |
Category |
Date |
Preview |
| Jastafuhrer 13 | Dumas Kit #222, Fokker EIII | Build | 19-Jan-14 10:46 | 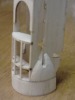 | | Views : 447 | | Another view of the cowl and fuselage front. |
| Jastafuhrer 13 | Dumas Kit #222, Fokker EIII | Build | 19-Jan-14 10:44 | 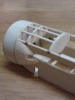 | | Views : 482 | | Here you can see that I've shaped the fairings behind the cowl. The picture quality isn't the greatest because it's s camera phone but you can see that I veneered the dash panel with 1/32 then sanded it down to ten thousandths before installing. I didn't want to see the end of the top stringers on the finished model. I have also sanded down all the burnt edges from the laser cuts for the same reason. It also trued up the edges because it appears the laser cuts with a slight angle. |
| Jastafuhrer 13 | Dumas Kit #222, Fokker EIII | Build | 19-Jan-14 10:38 | 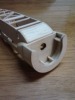 | | Views : 419 | | Cowl is fitted to the fuselage. Area between is also filled with a formed piece instead of bits. the bend radius is the same as the cowl so it was easy. |
| Jastafuhrer 13 | Dumas Kit #222, Fokker EIII | Build | 19-Jan-14 10:34 | 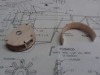 | | Views : 394 | | Cowl strip ids dry and ready to trim and glue |
| Jastafuhrer 13 | Dumas Kit #222, Fokker EIII | Build | 19-Jan-14 10:30 | 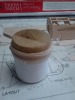 | | Views : 433 | | The kit instructions have the cowling filed in with bits of 1/8 x 1/16. I decided to do it in one piece. This is a wooden block from my son's toy chest that has almost the exact radius required. The card stock is a guide to keep the balsa s square to the form. I put the piece in a bowl of water in microwave to stream it. |
| Jastafuhrer 13 | Dumas Kit #222, Fokker EIII | Build | 19-Jan-14 10:24 |  | | Views : 427 | | Fuselage is coming along. I've added cross bracing in the bays behind the cockpit top and bottom. Might add a little weight but at least it's up near the front. |
|
