| Build Thread, Page :
[ 1 ] 2 (36 posts, 20 posts per page, 2 pages in total)
|
[ Next > ] |
| droid, Comment for image # 8746 | 20 Sep 08 12:20 |
| Hi DanRC - yes I flew it one more time recently - I took your advice on the incidence angles, I gave each of the wings a small amount of washout (5 deg.). and also mixed in rudder with the ailerons. It seemed to fly a bit less erratic, however every so often the tail would just swing one way or the other and I would be in a panic mode getting it to behave again. possibly some gusts of wind, so I plan to wait for the weather to cool down here in Phoenix and go early in the morning. It would be much better to install two servos in the wings and mix the ailerons with a very asymmetrical response; much more up than down. Along with mixed rudder the plane will yaw properly along with the roll. I am now working on the Guillows P51 ! |
| danrc, Comment for image # 8746 | 11 Sep 08 11:40 |
| Any more flights on this guy?
|
| Xanadu, Comment for image # 8746 | 13 Jul 08 10:04 |
| If I recall properly, even the full size version requires a lot more vertical stab than normal, since it has a tendency to flop over on itself. Its a very tricky plane to fly.
Looks great, nice job. |
| droid, Comment for image # 8746 | 12 Jul 08 22:19 |
| Just changed my shorts after my first flight... This plane is quite a handful. It was 100F and a few gusts here and there so I will wait for more calm conditions next time. It took a few attempts to get the take-off; seems that 60% throttle is good be ready to correct the moment it is airborne. Not sure if the gusts were bouncing it around or if it was just unstable... once in a while it seemed like I could use a bit more vertical stabilizer (expected). the landing was bumpy and the wheels popped off, an easy matter to glue back on however. I actually flew it a week ago, but the flight was 1-2 seconds; the prop just took off without the plane (o-ring busted) and the bumpy landing broke one of the outer struts (as danrc predicted !) so I added a very thin carbon brace top to bottom on the struts and the plane feels very strong now. |
| droid, Comment for image # 8746 | 24 Jun 08 10:28 |
| Hi Dan, The covering had no effect on the wing structure, if anything (as with all shrink cover) it helped me adjust the wings by being able to twist the wing and iron out the wrinkles. Just as instructions call out, it is key to cover the plane in small sections. |
| danrc, Comment for image # 8746 | 24 Jun 08 09:43 |
| You're motivating me to either recover mine or build a second plane. I love the look. I'm curious, did your covering warp the wings at all? |
| danrc, Comment for image # 8746 | 24 Jun 08 09:41 |
| It should fly. Just fiddle with the incidence angles on the top wing if necessary. The stock setting needs a little more fiddling with to obtain the correct setting. If need be, add a little washout to your wings as well. I can't wait to hear how it flies! |
| droid, Comment for image # 8746 | 24 Jun 08 01:58 |
| Hi Dan, I did use a lot of carbon on the wing struts and the ribs and fuselage where the struts end up were also reinforced with 1/64 ply - I was wondering about the outer struts... thanks for the kind words and advice. |
| droid, Comment for image # 8746 | 24 Jun 08 01:52 |
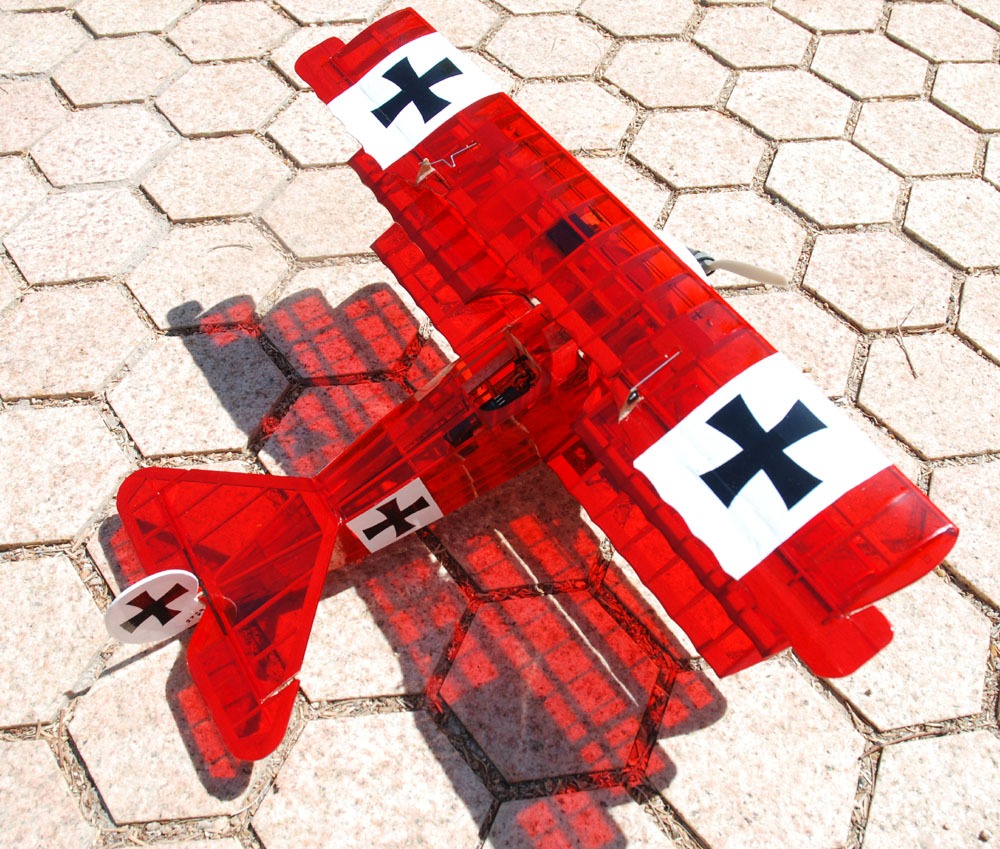
| Hi James, your DR1 images inspired me to start my DR1 by the way, thanks ! I tried to show as many photos of the modifications to the kit - hopefully this can contribute to the formula. Let's hope it flys... |
| droid, Comment for image # 8759 | 24 Jun 08 01:32 |
| Hi danrc - yeah I had a feeling the wheels will take a beating, I did use carbon rods for a total of 4 and the front two go deep into a balsa block the rear are supported with ply on the lower wing - take a look at the other shots. Glad to see yours up and flying, I look forward to the first flight ! |
| danrc, Comment for image # 8759 | 23 Jun 08 10:06 |
| You may want to reinforce that balsa on the wheel assembly. I'll try to photograph my modifications. I used wire, which adds weight, but as long as it's close to the point of CG, it's fine. Where's your CG? |
| danrc, Comment for image # 8746 | 23 Jun 08 10:04 |
| Beautiful. I really like your covering job on this one. One word of advice if I may, try reinforcing the outer struts as well. The top wing takes a beating. You may want to also consider putting some wires crossed between the inner cabanes and attached to your wings. My 'blue max' is a real charmer in the air, I'm sure your plane will impress everyone. Great job. Post some video links! |
| jgood, Comment for image # 8749 | 22 Jun 08 19:51 |
| Nice work. The brass skin on the tail skid is a great idea, I need to do that. |
| jgood, Comment for image # 8746 | 22 Jun 08 19:49 |
| Another one! Excellent. We have a huge collection of Dr.1's here - very cool. This one looks great too. I still have to put the cylinders back on mine. Maybe we should all get together and work out the best formula for the ultimate r/c Guillows Dr.1. |
| Xanadu, Comment for image # 8747 | 22 Jun 08 18:56 |
| Shrinkage is minimal for warping these flimsy structures? |
| droid, Comment for image # 8747 | 22 Jun 08 18:15 |
| thanks - Ultracote was used - lighter than Monocote and easier to apply for small models |
| Xanadu, Comment for image # 8747 | 22 Jun 08 17:21 |
| What did you use for the covering? Looks great! |
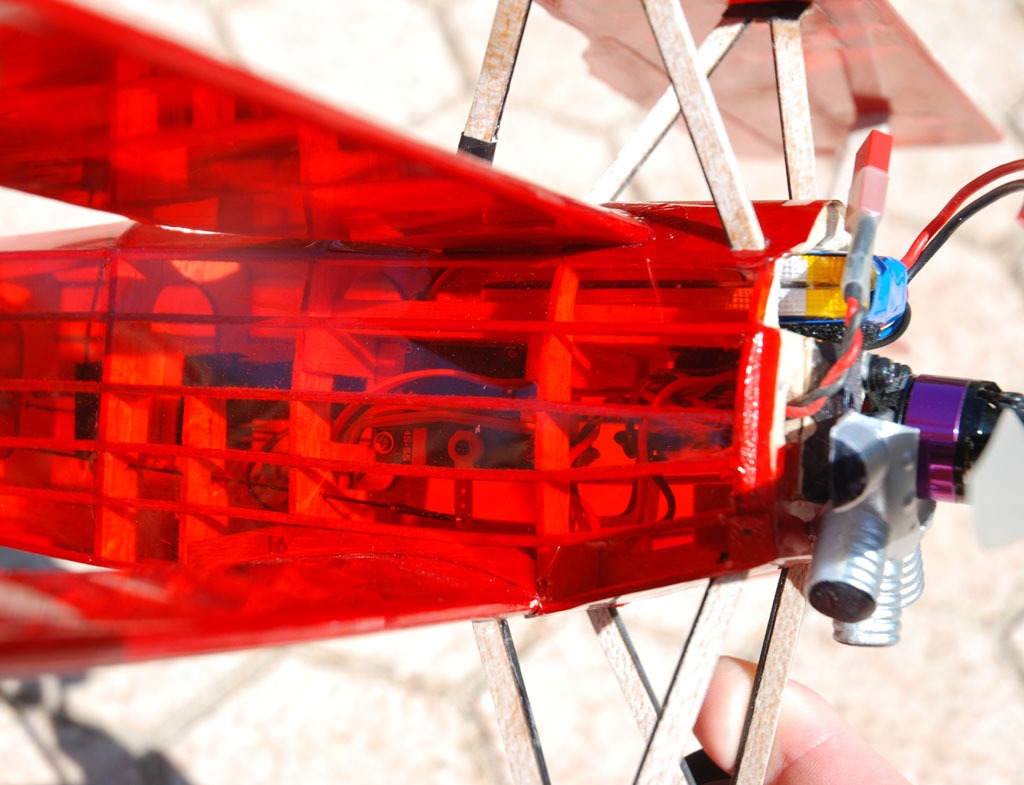
| droid, Comment for image # 8751 | 22 Jun 08 15:20 |
| also added a few washers on top engine bolts for proper prop attitude - tray for battery allows for easy access - later added Velcro to both plane and battery |
| droid, Image # 8761 | 22 Jun 08 15:12 |
note carbon in wing struts - servo wires taped along strut |
| droid, Image # 8760 | 22 Jun 08 15:11 |
decals were not used, cut new ones from film |
| Build Thread, Page :
[ 1 ] 2 (36 posts, 20 posts per page, 2 pages in total)
|
[ Next > ] |
