| Hangar |
Aircraft |
Category |
Date |
Preview |
| SteveM | Guillows Series 400 - P-51 Mustang | Build | 07-Sep-08 01:58 | 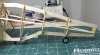 |
| Views : 864 |
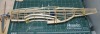
| The tail wheel was working just fine till I put on the main wheels and gave it a test roll. This is also the first time I have used a wheel with a metal hub so I was actually able to solder on metal washers to hold it in place. |
| SteveM | Guillows Series 400 - P-51 Mustang | Build | 07-Sep-08 01:55 | 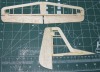 |
| Views : 798 |
| I was going to use small Du-Bro hinges on the tailfeathers till the unthinkable happened, someone set a "free" box outside their office door with a box of perfectly good 3.5" floppies in it. So now I have hinge material that it just the right size. |
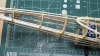
| SteveM | Guillows Series 400 - P-51 Mustang | Build | 30-Aug-08 23:48 |  |
| Views : 863 |
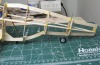
| After doing some more work today I couldn't resist temporarily attaching the tailfeathers to see if it wouldn't look more like a P-51. The next step is to install the tailwheel in its scale location then figure out how to make all the linkages work. |
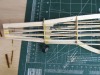
| SteveM | Guillows Series 400 - P-51 Mustang | Build | 20-Aug-08 02:41 | 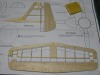 |
| Views : 826 |
| I went with the FF open frame on the non-movable parts and used some 10 lb. cu. ft. C grain for the movable parts (the aileron will have to be cut out to fit the rudder). The kit supplied wood for this was as heavy as plywood so I opted not to use it. |
| SteveM | Guillows Series 400 - P-51 Mustang | Build | 29-Jul-08 22:47 |  |
| Views : 874 |
| Some of us are young enough to enjoy video games and old enough to enjoy working with our hands too. Almost done fabricating the motor mount. |
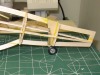
| SteveM | Guillows Series 400 - P-51 Mustang | Build | 25-Jul-08 02:57 | 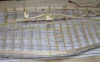 |
| Views : 834 |
| Here you can see the brass insert and the hole where the dowel goes. I used orderless thin CA on the brass insert so I will find out in a few hours if it effects me like normal CA. |