| Hangar |
Aircraft |
Category |
Date |
Preview |
| rayl | Scratch Built Consolidated XF-92A | Build | 09-Feb-15 10:25 | 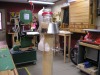 | | Views : 526 | | All shrunk down and ready to trim it out. |
| rayl | Scratch Built Consolidated XF-92A | Build | 09-Feb-15 10:24 | 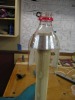 | | Views : 432 | | I had a little time in the shop yesterday while the LOML was shopping, so I thought that I would do another "Shrinky-Dink' for the Afterburner tail piece. Here is the portion of the Coke bottle over the form before applying heat to it. |
| rayl | Scratch Built Consolidated XF-92A | Build | 07-Feb-15 13:40 | 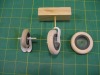 | | Views : 512 | | Dosen't look like a full 2 days work does it? BTW; when I said that I was machining the parts, it was all done with standard, i.e. full size, turning gouges and machinist files to work down to the final size. |
| rayl | Scratch Built Consolidated XF-92A | Build | 07-Feb-15 13:37 | 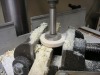 | | Views : 585 | | Drilling the center of the tire out. (Looks like a shot from Fine Woodworking doesn't it?) |
| rayl | Scratch Built Consolidated XF-92A | Build | 07-Feb-15 13:36 | 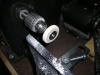 | | Views : 491 | | Turning the wheels out of Basswood on the lathe. |
| rayl | Scratch Built Consolidated XF-92A | Build | 07-Feb-15 13:34 | 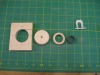 | | Views : 517 | | While I'm waiting for the Gloss White paint to dry: I always try to let white sit for a least a week before I touch it, I started to work on the Landing gear. The progression from left-tp-right: (1) Cut out the shape on the jig-saw, (2) establish the shape of the tire on the lathe, (3) drill the hub hole out to finish the tire, (4) machine the hub to size out of "black" PVC pipe, (5) machine the Hub disc out of 3/16" plexi. The Nose Gear yoke above was assembled during our last snowstorm, all out of styrene. |
|
| Hangar |
Aircraft |
Category |
Date |
Preview |
| rayl | Scratch Built Consolidated XF-92A | Build | 29-Jan-15 12:37 | 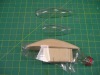 | | Views : 556 | | SO, here are the three sections of the canopy for the XF-92A. I need to trim them all to fit. One thing that I should have done was lay out the section lines right on the master to give me a guide for cutting them. I know that I have probably forgotten to put in some information, so if you have a question; feel free to ask. |
| rayl | Scratch Built Consolidated XF-92A | Build | 29-Jan-15 12:34 | 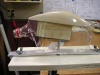 | | Views : 511 | | Done applying heat. BTW I have a paint stripper gun that I use; don;t know if a hairdryer has enough power to do this. This master is about 7 1/2" long as is just at the maximum that will work with a "Coke" bottle. I had already formed two other sections of this canopy, the windshield and the clam-shell portion of the canopy so I was interested in forming the back turtle-deck here which explains why the front of teh canopy is not fully formed. When appyling the heat, be aware that if the plastic starts to fog, it has shrunk as far as it is going to at that point. Also, you might find that there are some creases of folds that appear when forming: just judiciously apply a little more heat to that area and they will go away. |
| rayl | Scratch Built Consolidated XF-92A | Build | 29-Jan-15 12:27 | 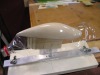 | | Views : 489 | | This is a shot of how the bottle is shrinking when I'm about half-way through the process. I keep pushing teh form up as the plastic shrinks. The bar is a piece of 1/4' X 1" aluminum and it does deflect during the process. Start applying the heat BELOW the master to keep wrinkles from forming and to insure even shrinking around the master. |
| rayl | Scratch Built Consolidated XF-92A | Build | 29-Jan-15 12:23 | 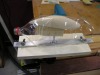 | | Views : 490 | | Here the canopy master has been inserted into the bottle and the caulk gun used to put tension on the bottle prior to beginning to heat the plastic. |
| rayl | Scratch Built Consolidated XF-92A | Build | 29-Jan-15 12:21 | 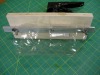 | | Views : 460 | | THis is the top side of the rig. The piece od aluminam strap is to keep tension on the 2 liter bottle as the forming process progresses. I ussed a a couple 1/2" X 20 carriage bolts with wing nuts to allow for easy removal and installation. See how the (open-ended) bottle is clamped to the ply? |
| rayl | Scratch Built Consolidated XF-92A | Build | 29-Jan-15 12:17 | 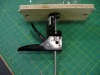 | | Views : 465 | | I thought that I would share a method for forming canopies (or any other shape that you might want to mould) out of a 2 liter softdrink bottle. This is the apparatus that I duplicated from "ModelMaster 2001" over on the RC Groups forum. It is a el-cheapo caulk gun mounted to a piece of 3/4" ply. I shortend the caulk gun body by about 4 inches to make sure that I had enough stroke to keep the form tight to the plastic when heat is added. |
|
