| Hangar |
Aircraft |
Category |
Date |
Preview |
| David Duckett | Dumas Kit #1815,DeHavilland DH89 Dragon Rapide | Build | 26-Mar-10 19:26 | 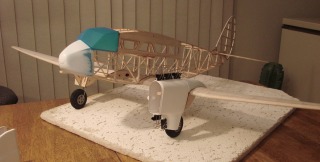 | | Views : 1032 | | The CA and zapper/kicker may seem like overkill but it works and stands up to the sanding and shaping. |
| David Duckett | Dumas Kit #1815,DeHavilland DH89 Dragon Rapide | Build | 26-Mar-10 19:22 | 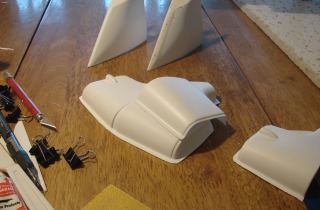 | | Views : 945 | | That's white putty on the one at top. The piece sitting on the other is molded wrong in that the edges are more round than 90* and that would leave a gap between the pieces when gluing together. The bottom piece is fine. The two front cowlings are also defective so a call to Dumas, who lives here, fixed that. |
|
| Hangar |
Aircraft |
Category |
Date |
Preview |
| David Duckett | Dumas Kit #1815,DeHavilland DH89 Dragon Rapide | Build | 26-Mar-10 19:17 |  | | Views : 1040 | | To glue the plastic pieces together: The two halves are clamped together and the plastic weld cement is applied and let cure for at least 15 seconds. I let it sit for at least 30 minutes. Then a styrene rod is bent to shape and glued into the groove where the two pieces are clamped and that sits for awhile, too. Then add a bead of medium CA on both sides of the rod inside the pieces and hit it with a shot of "zapper", accelerant, and let the whole thing sit overnite, clamps in place. Next day remove the clamps and trim off as much of the plastic as you can with good scissors which should leave about 1/16" or less of excess plastic. I found rough sandpaper to be the best way to remove the excess as it's quite tough after all the gluing. When it gets to a fairly smooth surface apply white putty with a spatlua and let it dry for about 30 minutes and then sand with 150 sandpaper. Any imperfections can be filled with regular filler and sanded with a finer grade sandpaper. The two finished pieces here have also been painted white along the seams. |
| David Duckett | Dumas Kit #1815,DeHavilland DH89 Dragon Rapide | Build | 26-Mar-10 18:57 |  | | Views : 1106 | | Well...it should have been a bit more shallow. This is easily fixed with wood and filler but it might be a problem on the flying versions. |
|
