|
|
| Hangar |
Aircraft |
Category |
Date |
Preview |
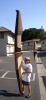
| pfinn | Scratch Built Holiday | Reference | 27-Sep-09 18:07 |  | | Views : 1255 | | Cleaning out the garage for winter building. This was my high school "Wood Shop" project. "Bird of Time". |
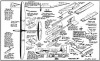
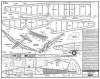
| pfinn | Scratch Built Holiday | Reference | 27-Jul-09 13:44 | 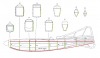 | | Views : 1289 | | Hello scirocco14. Here's my $.02. This looks strikingly similar to what happened to my "Holiday" fuselage (actually my plane looks like this since this came first!). Here we go. The red and green lines represent the side frames to be built first. Note that the top stringer is straight! The green vertical formers' lengths are measured from the angled lines on the cross sections to define the bottom stringers curvature. The side view on the plan is the fuselage is a depiction of the completed fuse therefore the verticals are "Forshortened" (not perpendicular to the view). After building two side frames use crossmembers measured from the cross sections (F#'s) to build the fuse. See on the side view that the aft portion of the fuse curves up? This happened to me while making the Holiday quite by accident. By changing the cross section from nearly rectangular to trapazoidal to triangular, one is forcing the top stringer to travel further. But since it is already at a set length it will pull the rear of the fuse in an upward curve like a canoe. I'd leave the stringers long on the tail-end and trim after the vert fin position is determined. Don't use my little sketch as a plan cause I just "Eyeballed" it to give visual reference. Get ready for some compound angle miter sanding on those crossmembers! He He! But seriously, this should make a really sweet fuselage. Hope this helps, and moreover, hope it works! |
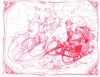
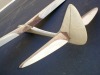
| pfinn | Scratch Built Holiday | Flying | 28-Jun-09 02:08 |  | | Views : 885 | | Flying with Swallows at my Dad's place in Solvang CA. There was about fifty of them. Maybe they thought I found them dinner! |
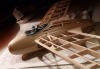
| pfinn | Scratch Built Holiday | Build | 28-Jun-09 01:55 | 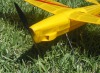 | | Views : 779 | | Added both fresh air intake and rear facing "exhaust" vents. Was getting a bit warm inside. Both of these are to replaced with internal ducting. These kinda ruin the clean lines of the plane. They just looked so small when I was making them. |
| pfinn | Scratch Built Holiday | Build | 28-Jun-09 01:45 | 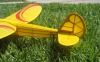 | | Views : 791 | | Adding 1/8" to the perimeter of the vertical stabilizer added about 3/4 sq" area. This solved the "Wandering Tail" issue. Also reduced wing incedence a smidge. |
| pfinn | Scratch Built Holiday | Parked | 21-Jun-09 19:23 | 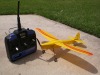 | | Views : 843 | | Well, that's it I suppose. Just n less downthrust and more verttical stab area, both easy fixes. Overall I'm quite pleased with the performance and the "Nostalgic" look. Back to the EIII for now. |
|