| Hangar |
Aircraft |
Category |
Date |
Preview |
| Skyediamonds1985 | Guillows Series 200 - SE5a | Parked | 01-May-16 20:19 | 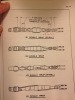 | | Views : 551 | | This is from the published FAA repair manual part 43.13 on turnbuckles. |
| Skyediamonds1985 | Guillows Series 200 - SE5a | Build | 25-Apr-16 21:32 |  | | Views : 403 | | However, with the two strips acting as safety margins, I hand-painted the tubular strip of plastic glued in between. The results make for pretty convincing hinges. |
| Skyediamonds1985 | Guillows Series 200 - SE5a | Build | 25-Apr-16 21:30 | 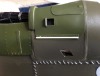 | | Views : 397 | | The glossy strips of paper with the rivet decals were painted first, before glued onto the model. This is to control exactly what I'd like on the finished results. I could take a chance and hand-paint the strips, but I didn't want to risk it. Especially at my age of retirement. |
| Skyediamonds1985 | Guillows Series 200 - SE5a | Build | 25-Apr-16 21:26 | 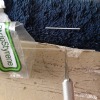 | | Views : 390 | | Then I cut lengths of full round plastic strips to match the length of the glossy paper strips. As you can see, Evergreen Plastics can make them very small and thin. They also do this with half-round strips too. Those will be used as rigging between the wings. |
| Skyediamonds1985 | Guillows Series 200 - SE5a | Build | 25-Apr-16 21:24 | 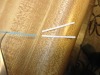 | | Views : 395 | | To fabricate what appears to be hinges to hold the machine gun covers in place, I cut thin strips of glossy paper and used MicrtoMark's rivet decals. |
| Skyediamonds1985 | Guillows Series 200 - SE5a | Build | 25-Apr-16 21:19 |  | | Views : 374 | |
|
| Hangar |
Aircraft |
Category |
Date |
Preview |
| Skyediamonds1985 | Guillows Series 200 - SE5a | Build | 25-Apr-16 21:17 | 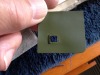 | | Views : 312 | | After careful cutting and trimming (and trimming), I cut out the hole and used MicroMark's rivet decals to simulate the opening for the ejected shells. Then painted glossy olive drab for that "factory fresh" look |
| Skyediamonds1985 | Guillows Series 200 - SE5a | Build | 25-Apr-16 21:14 | 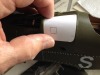 | | Views : 307 | | Like previous covers, I'm using medium thick glossy paper. The glossy surface is smooth and does not exhibit any signs of fibers normally seen on paper. I can use either glossy paint, or flat to suit my tastes. |
| Skyediamonds1985 | Guillows Series 200 - SE5a | Build | 25-Apr-16 20:55 |  | | Views : 335 | | Added a second means of support for the cover. I decided to simply attach the rear portion of the covering directly to the fuselage at the joint. Just like the real aircraft. |
| Skyediamonds1985 | Guillows Series 200 - SE5a | Build | 25-Apr-16 20:51 |  | | Views : 288 | | Good afternoon guys. I'm continuing with the fabrication of the housing over the Vickers machine gun. As you can see, pictorial information is a rare commodity. The Vintage Aviator helped some, but in this area, there really isn't much visual information. |
| Skyediamonds1985 | Guillows Series 200 - SE5a | Build | 24-Apr-16 15:56 | 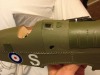 | | Views : 372 | | I should point out that after the tape was carefully measured and cut out to suite both the plastic glass and square hole, that it was first painted olive drab before applying to the fuselage. This is the end result, after the use of MicroMark's rivet decals. |
| Skyediamonds1985 | Guillows Series 200 - SE5a | Build | 24-Apr-16 15:53 |  | | Views : 320 | | I used black electrical tape as the frame. It has its own self-adhesives, very flexible to fit over the "glass," and its easy to cut. |
|
