| Hangar |
Aircraft |
Category |
Date |
Preview |
| Skyediamonds1985 | Guillows Series 400 - P-51 Mustang | Build | 08-Jun-18 21:04 |  | | Views : 973 | | How to cut strips to length of the former? No need for complex mathematics. Just grab the former and roll it over the first strip and .... |
| Skyediamonds1985 | Guillows Series 400 - P-51 Mustang | Build | 08-Jun-18 21:02 | 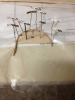 | | Views : 958 | | The plans and the whole frame calls for this piece to be installed. Solution? Laminated strips to the exact same shape as the former. Now, you're probably going to say "Yeah, but because the strips are laminated on the outside circumference of the part, that'll make the final result bigger than the original. Hope you kept in mind my previous posts, that the outline of the fuselage on Guillow's fuselage is slightly more slim than the true outline as compared to the 3-views. Sooo, This should (hopefully) work out with the planking an all..... |
| Skyediamonds1985 | Guillows Series 400 - P-51 Mustang | Build | 08-Jun-18 20:58 | 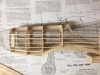 | | Views : 1042 | | Here's a good side view of the same part on top of the plans. |
| Skyediamonds1985 | Guillows Series 400 - P-51 Mustang | Build | 08-Jun-18 20:57 | 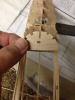 | | Views : 942 | | B-8 is the former that is used to help shape the fuselage around the front windshield and often mistook for the instrument panel. |
| Skyediamonds1985 | Guillows Series 400 - P-51 Mustang | Reference | 08-Jun-18 20:55 | 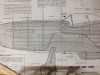 | | Views : 976 | | A close up of the cockpit area shows the coaming around the front windshield to be at an angle. This is where a lot of modelers make a mistake and "assume" this also doubles as the instrument panel. The instrument panel is more vertical and its also located i"inside" or under the coaming. |
| Skyediamonds1985 | Guillows Series 400 - P-51 Mustang | Build | 07-Jun-18 01:05 | 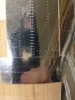 | | Views : 929 | | Hey, not too bad, eh? I tried a combination of small panels, butt panels, overlapping panels, single and double rivet patterns. All came out really nice. Total application time for all of the small section panels and rivets, about 15 minutes. |
|
| Hangar |
Aircraft |
Category |
Date |
Preview |
| Skyediamonds1985 | Guillows Series 400 - P-51 Mustang | Build | 07-Jun-18 01:03 | 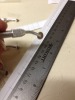 | | Views : 904 | | This time I purchased a set of "pounce wheels" from MicroMark to be used to reproduce rivets on the backside for the rivet patterns to be seen on the front side. I only needed to run down the pounce wheel along a straight edge. No mind-numbing tapping of the hammer over tens of thousands of faux rivets. |
| Skyediamonds1985 | Guillows Series 400 - P-51 Mustang | Build | 07-Jun-18 01:00 | 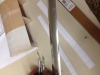 | | Views : 630 | | From this roll, I cut up some sample strips. |
| Skyediamonds1985 | Guillows Series 400 - P-51 Mustang | Reference | 07-Jun-18 00:58 | 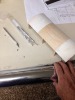 | | Views : 586 | | I'm sure you all have read various means of achieving a natural metal finish. Silver or chrome spray paint, plumber's duct tape, a special product called "Flight Metal" which advertises as being the "cat's meow" for natural metal finishes, and more. IA friend suggested trying what is called "Chrome Vinyl." He says its just as flexible as Flight Metal, comes in three-foot wide rolls and cut to however length to suit the requirements. I ordered a 10-foot roll. That should be enough for a 27" w/s Guillow's model, eh? |
| Skyediamonds1985 | Guillows Series 400 - P-51 Mustang | Reference | 07-Jun-18 00:53 | 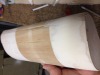 | | Views : 847 | | Before any serious build takes place, I decided to construct a "practice fuselage" to which I could explore different finishing techniques and determine which is best suited for my needs. In this case, I fabricated a scrap proof-of-concept fuselage section out of scrap balsa. I finished the ends with wood filler, lightly sanded, more wood filler, sanded again, followed by primer and sanding again for a glass-smooth finish. I purposely left the center section bare balsa sanded smooth. I wanted to compare what affects the underlying surfaces would have on the finish. I read about, and was told repeatedly that an absolutely smooth surface is essential for an equally impressive finish regardless of whether its natural metal or painted surfaces. |
| Skyediamonds1985 | Guillows Series 400 - P-51 Mustang | Reference | 07-Jun-18 00:47 |  | | Views : 561 | | Finally, get as much reference material as possible whether its the Internet, magazines, personal photos, anything will help |
| Skyediamonds1985 | Guillows Series 400 - P-51 Mustang | Reference | 07-Jun-18 00:46 | 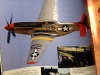 | | Views : 627 | | This picture clearly illustrates the type of highly polished finish I had in mind. This photo also shows to good effect how the fuselage is left in its all-polished metal but the wings were puttied and painted silver. A fact not many people are aware. |
|
