| Hangar |
Aircraft |
Category |
Date |
Preview |
| rayl | Scratch Built Loening OL-8 Amphibian | Build | 21-Jun-15 15:57 | 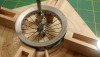 |
| Views : 501 |
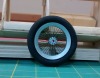
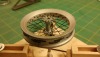
| here the bottom side is done, starting on the top side. |
| rayl | Scratch Built Loening OL-8 Amphibian | Build | 21-Jun-15 15:56 |  |
| Views : 438 |
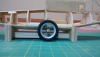
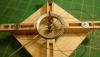
| Starting to weave the spokes. Do the lower side first. Note that when I drilled the holes in the rim, I offset thealternating holes by about the with of my drill bit to allow for full access to the holes as the weaving progresses. ANother nice thing about this jig is that you can offset the hub to either side of center to replicate wheels that have offset spokes in real life. The toothpick (lower right) is jambed into the last filled spoke hole to maintain the tension as the weave progresses. |
| rayl | Scratch Built Loening OL-8 Amphibian | Build | 21-Jun-15 15:51 | 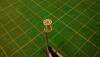 |
| Views : 444 |
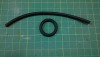
| Completed hub. In this instance I used a 1/2" long piece of 1/8" ID Evergreen tubing. |
| rayl | Scratch Built Loening OL-8 Amphibian | Build | 21-Jun-15 15:49 | 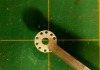 |
| Views : 436 |
| My apologies for the horrendous spelling, I'll do better. This is the hub after the 10 holes have been drilled. Now, do it again. |
| rayl | Scratch Built Loening OL-8 Amphibian | Build | 21-Jun-15 15:47 | 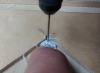 |
| Views : 441 |
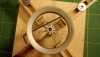
| Not that you need it, but I made a small "V-notch" jig to cradle the hub. It is rather finicy to set up but once it is set, the distance of the holes from the edge of the hub is locked in. Note the high tch clamping mechanism, so all help is appreciated. I used a No. 47 drill which is probably oversized for the spoke material. |
| rayl | Scratch Built Loening OL-8 Amphibian | Build | 21-Jun-15 15:38 | 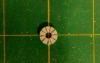 |
| Views : 458 |
| Laying out the number of holes on one of the hub pieces. This is a piece of 0.060" styrene about 1/2 " in diameter. |