| Hangar |
Aircraft |
Category |
Date |
Preview |
| rayl | Scratch Built Loening OL-8 Amphibian | Build | 21-Jun-15 16:09 | 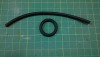 | | Views : 497 | | Tire material: before and after. This a piece of vacuum hose from teh atuomotive store. You can also use foam filler rod. I cut the tubing just a LITTLE shorter than the teh circumference of the rim and used gell superglue and held it together for a minute until the CA set-up. I snaded the whole tire down with 100 grit papaer then use my Dremel tool with a coarse scotch-brite wheel to buff it all to the same appearance. |
| rayl | Scratch Built Loening OL-8 Amphibian | Build | 21-Jun-15 16:03 | 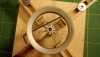 | | Views : 494 | | It even goes round-n-round! |
| rayl | Scratch Built Loening OL-8 Amphibian | Build | 21-Jun-15 16:02 | 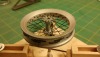 | | Views : 529 | | All done. Note the offset of the rim holes as I mentioned earlier. |
| rayl | Scratch Built Loening OL-8 Amphibian | Build | 21-Jun-15 16:01 | 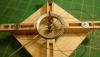 | | Views : 502 | | Working on the top side with the wire all tangled up. I found that you should take time to un-tangle the wire about every three holes. Also, as John O intoned, MAKE SURE that the length of the piece of the spoke material is long enough!!! (40 spokes) X (1 1/8 radius) = 50 inches. I added 10 inches for a comfort factor. |
| rayl | Scratch Built Loening OL-8 Amphibian | Build | 21-Jun-15 15:57 | 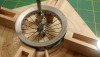 | | Views : 507 | | here the bottom side is done, starting on the top side. |
| rayl | Scratch Built Loening OL-8 Amphibian | Build | 21-Jun-15 15:56 |  | | Views : 443 | | Starting to weave the spokes. Do the lower side first. Note that when I drilled the holes in the rim, I offset thealternating holes by about the with of my drill bit to allow for full access to the holes as the weaving progresses. ANother nice thing about this jig is that you can offset the hub to either side of center to replicate wheels that have offset spokes in real life. The toothpick (lower right) is jambed into the last filled spoke hole to maintain the tension as the weave progresses. |
|
| Hangar |
Aircraft |
Category |
Date |
Preview |
| rayl | Scratch Built Loening OL-8 Amphibian | Build | 21-Jun-15 15:51 | 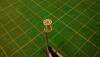 | | Views : 450 | | Completed hub. In this instance I used a 1/2" long piece of 1/8" ID Evergreen tubing. |
| rayl | Scratch Built Loening OL-8 Amphibian | Build | 21-Jun-15 15:49 | 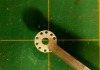 | | Views : 443 | | My apologies for the horrendous spelling, I'll do better. This is the hub after the 10 holes have been drilled. Now, do it again. |
| rayl | Scratch Built Loening OL-8 Amphibian | Build | 21-Jun-15 15:47 | 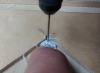 | | Views : 447 | | Not that you need it, but I made a small "V-notch" jig to cradle the hub. It is rather finicy to set up but once it is set, the distance of the holes from the edge of the hub is locked in. Note the high tch clamping mechanism, so all help is appreciated. I used a No. 47 drill which is probably oversized for the spoke material. |
| rayl | Scratch Built Loening OL-8 Amphibian | Build | 21-Jun-15 15:38 | 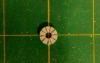 | | Views : 464 | | Laying out the number of holes on one of the hub pieces. This is a piece of 0.060" styrene about 1/2 " in diameter. |
| rayl | Scratch Built Loening OL-8 Amphibian | Build | 21-Jun-15 15:36 | 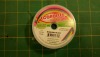 | | Views : 473 | | THis is what I used for the OL-8 wheels. The "stretchy stuff" also works well and due to it bigger diameter, visually fills the spoke area more. I couldn't find any surgical thread locally like John O used so I went with what I could find. I don't think that regular thread is a good choice if you live in an area that has big swings in humidity. |
| rayl | Scratch Built Loening OL-8 Amphibian | Build | 21-Jun-15 15:31 | 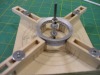 | | Views : 423 | | I thought that I wouls share my method of building spoked wheels. John O is the inspiration but I have added a few of my own twists to the process. Several things that I need to mention before progressing: (1) After determining the number of spokes that you want, the hub has to have 1/4 the number of holes (per side) that the wheel rim does, i.e, if the rim is going to have 40 spokes the hub requires 10 holes per side. (2) when assembling the wheel hub, I think that it looks better if the hub holes are staggered. (3) The jig, as shown does not have to have a tight hold on the rim, I like to be able to rotate the hub/rim assembly while lacing up the spokes. |
|
