| Hangar |
Aircraft |
Category |
Date |
Preview |
| edtherenderman | Cleveland Westland Whirlwind | Build | 30-Mar-22 11:21 | 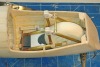 |
| Views : 220 |
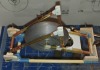
| Gear fully retracted in the Nacelle. Looking down into the top of the nacelle. |
| edtherenderman | Cleveland Westland Whirlwind | Build | 30-Mar-22 11:20 |  |
| Views : 167 |
| Gear doors closed. Doors where created using the piece cut out of the nacelle as a buck, then vacuum formed styrene over the buck. The styrene was supper thin and flexible, so I built up the insides with many layers of tissue and EZ-Dope. The outsides where filled with spackling compound, sounded, tissued, doped and painted with sanding primer. I still need to add small magnets to keep the doors together when closed. |
| edtherenderman | Cleveland Westland Whirlwind | Build | 30-Mar-22 11:19 |  |
| Views : 165 |
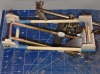
| Inside of nacelle looking down. You can see the hinges for the gear doors. The tee pins will be replaced with hinge pins before installing the nacelle on the wing. |
| edtherenderman | Cleveland Westland Whirlwind | Build | 30-Mar-22 11:18 | 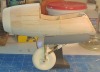 |
| Views : 174 |
| Did not estimate that it would take over a month of weekends and evenings to get the landing gear sorted, but here it is. Starboard landing gear down. |
| edtherenderman | Cleveland Westland Whirlwind | Build | 14-Mar-22 10:56 |  |
| Views : 188 |
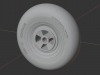
| Close up of the lettering on the tire. The plastic appears a little pink which is a reaction to the ultraviolet light it takes to cure the resin. The longer you let it “cook” the more pink it gets. Leave it in long enough and it takes on the deep skin pink color that the old William Brothers scale plastic pilots have! |
| edtherenderman | Cleveland Westland Whirlwind | Build | 14-Mar-22 10:52 | 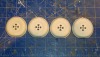 |
| Views : 201 |
| Tire/Wheel halves printed. Each took 6.25 hours! Not very fast, but the detail is pretty good. I could print these as one piece but there is so much cleanup and filling to do once the support structures are removed that it is easier to print as two pieces and glue together. |