| Hangar |
Aircraft |
Category |
Date |
Preview |
| Skyediamonds1985 | Guillows Series 200 - SE5a | Build | 17-May-16 20:18 | 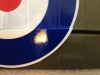 | | Views : 367 | | Close up reveals the extra decal needed to wrap itself around the aileron leading edge. The amount needed is totally subjective, meaning it's up to the modeler to determine how much to allow to wrap around the top portion of the aileron, yet not too much left over to start peeking out from the underside. I'd say about 1/3 to 1/2 of the leading edge outta do it. |
| Skyediamonds1985 | Guillows Series 200 - SE5a | Build | 17-May-16 20:15 | 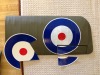 | | Views : 345 | | This is where ordering extra decals comes in handy. Two reasons: First, is in case of a screw up, and secondly, to provide some extra material to cover the rounded surfaces. |
| Skyediamonds1985 | Guillows Series 200 - SE5a | Build | 17-May-16 20:13 |  | | Views : 372 | | Not exactly absolutely clear picture, but it does reveal how the decal seemingly has enough surface area to wrap itself around the leading edge of the aileron and also the trailing edge of the wing. |
| Skyediamonds1985 | Guillows Series 200 - SE5a | Build | 14-May-16 18:49 |  | | Views : 333 | | Almost covered. I ducked out on the stitches. "Mr" Rayl takes the lead.... |
| Skyediamonds1985 | Guillows Series 200 - SE5a | Build | 02-May-16 22:31 |  | | Views : 404 | | Biplane guy: I suggest instead of using the Graf-x stick-type, try purchasing a small package of blank decal sheets. Most are available through Hobby Lobby or other fine arts and craft stores. They come either white or transparent backgrounds depending on your needs. My guess is to use the white background sheet as ink-jet printers do not print out white ink. The white background will make up for this by simply you making an outline of the letters/numbers then carefully cutting them out "INSIDE" the outline so as to eliminate the outline altogether. Special note: try adding a coat of clear paint (I use Krylon" |
| Skyediamonds1985 | Guillows Series 200 - SE5a | Parked | 02-May-16 22:18 |  | | Views : 399 | | The second part describes the setting solutions and their name brands. I personally use Micro Set. The Micro Sol, as the article states, is more of a solvent and really works hard on the decal in softening it up. I would try to avoid it, unless you wish to experiment on a sample. Be aware, that the setting solutions literally "grabs" the decals as you lay it down. Thus, I apply a bit of water using a small brush around the desired area. Then dip the brush into the Micro Set and mix it in by rubbing the brush all around the same desired area. Afterward, I apply the Micro Set on top of the decal. Allow it to dry thoroughly. II'm going to post additional info on my next pos |
|
| Hangar |
Aircraft |
Category |
Date |
Preview |
| Skyediamonds1985 | Guillows Series 200 - SE5a | Parked | 02-May-16 22:12 |  | | Views : 395 | | Part two of three |
| Skyediamonds1985 | Guillows Series 200 - SE5a | Parked | 02-May-16 22:11 |  | | Views : 366 | | Part one of three on decals. Please let me know if you can read this. |
| Skyediamonds1985 | Guillows Series 200 - SE5a | Build | 01-May-16 20:41 |  | | Views : 381 | | Used Brantley's custom decals. They're thinner than the Guillows and with the use of setting solution, really hugs the surfaces like paint. |
| Skyediamonds1985 | Guillows Series 200 - SE5a | Parked | 01-May-16 20:36 |  | | Views : 418 | | Thought you might find this interesting about nothing the surface tapes, as well as their width. Ciao for now. |
| Skyediamonds1985 | Guillows Series 200 - SE5a | Build | 01-May-16 20:33 |  | | Views : 436 | | Wing covered with heat-shrink Solartex. I also added surface tape. As mentioned in my previous posting, at 1,248 stitches and each one 1/16" across,, decided to keep my sanity at this point. At the wingtip, is the inspection window. Will post a close up later. |
| Skyediamonds1985 | Guillows Series 200 - SE5a | Parked | 01-May-16 20:29 | 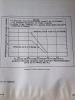 | | Views : 327 | | The speed of the aircraft determines the distance between stitches. On the S.E. 5 for example, this works out to 2.5 inches apart. With 52 ribs for both top and bottom wings (not including the false ribs along the leading edge) that works out to 1,248 stitches...... At this scale, each stitch works out to be 1/16" across. |
|
