| Hangar |
Aircraft |
Category |
Date |
Preview |
| LASTWOODSMAN | Aero-Werkes DPCM 119 BE2e | Parked | 02-Apr-17 21:39 | 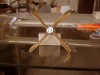 | | Views : 312 | | Finished prop all cladded up. The wrap arond edge strips were trimmed real close to the prop edge, leaving just enough to wrap the edge of the blade only - glued sparingly with 5 min Epoxy. |
| LASTWOODSMAN | Aero-Werkes DPCM 119 BE2e | Parked | 02-Apr-17 21:35 | 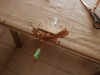 | | Views : 264 | | Here it is all clamped and pinned up - black styrofoam on each side of the blade - the white paper templates are lined up with the wooden blade. The green masking tape on the opposite blade is so that I don't accidentally break it off ... |
| LASTWOODSMAN | Aero-Werkes DPCM 119 BE2e | Parked | 02-Apr-17 21:30 | 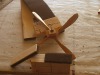 | | Views : 252 | | This is the "peel n stick" black styrofoam I used to hold the blade steady in order to press the claddings onto the blade tips. |
| LASTWOODSMAN | Aero-Werkes DPCM 119 BE2e | Parked | 01-Apr-17 09:34 | 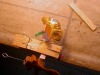 | | Views : 332 | | The cladding is glued to the prop and the white template paper is bent up so it does not glue. The two balsa strips used to pin down the prop, actually smeared and dented the one-week old Krylon clear finnish - I substituted some padding, for both sides of the prop, using some peel and stick balck styrofoam padding stuck to the pin down strips - that styrofoam padding is used for air conditioner draft seals. |
| LASTWOODSMAN | Aero-Werkes DPCM 119 BE2e | Parked | 01-Apr-17 09:26 | 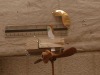 | | Views : 317 | | The white template is masking taped to the prop, and I brushed on a thin layer of 5 min epoxy to the wood - the cladding really wanted to slip and move around out of posiiton on a practise blade, which is why I used a template to make sure it was in the right positon as the glue dried. |
| LASTWOODSMAN | Aero-Werkes DPCM 119 BE2e | Parked | 01-Apr-17 09:20 | 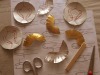 | | Views : 308 | | Brass coated coffee jar "freshness seals" (.001" thick) used for "S" shaped cladding cutouts that include extra cutout strips of "stretch out and wrap around edge strips". Template sheet for loating the cladding positions, one piece on each side of the prop. |
|
| Hangar |
Aircraft |
Category |
Date |
Preview |
| LASTWOODSMAN | Aero-Werkes DPCM 119 BE2e | Parked | 31-Mar-17 11:44 | 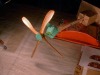 | | Views : 320 | | I removed the old "half circle" claddings from the prop tips, sanded the prop down to 400 grit paper, and sprayed 3 coats of Krylon Clear Gloss acrylic rattle can paint onto the balsa. |
| LASTWOODSMAN | Aero-Werkes DPCM 119 BE2e | Parked | 31-Mar-17 11:35 |  | | Views : 354 | | I have decided to scrap the old calddings and try to imitate the "S" shaped claddings of the 4 blade DH4 Rolls Royce prop. |
| LASTWOODSMAN | Aero-Werkes DPCM 119 BE2e | Parked | 31-Mar-17 11:32 | 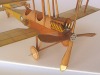 | | Views : 349 | | Originally, my 4 - blade BE2e prop had "half circle" cloth claddings made from brass 0.001" thick coffee jar freshness seals, and were just bent to shape and sliped over (not glued) to the prop tips. |
| LASTWOODSMAN | Aero-Werkes DPCM 119 BE2e | Parked | 28-Mar-17 21:57 | 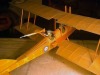 | | Views : 409 | | The machine gun assembly is mounted to the plane with the gunner in position. The gunner is also moveable, as he has a pin glued, that sticks out from his bottom, that sticks into a hole in the mounting plate in the gunner cockpit that the gunner figure sits on. |
| LASTWOODSMAN | Aero-Werkes DPCM 119 BE2e | Parked | 28-Mar-17 21:49 | 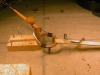 | | Views : 354 | | I then installed the Lewis machine gun (there is a wire sticking out from the bottom of the machine gun balsa bracket mount), into one of several adjustable holes drilled into the base ring. The aluminum top ring can slide to different positions over the base ring, and the machine gun can be placed into the different holes in the base ring. |
| LASTWOODSMAN | Aero-Werkes DPCM 119 BE2e | Parked | 28-Mar-17 21:43 | 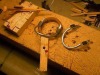 | | Views : 322 | | I made the adjustable top ring from 3/32" dia. aluminum tubing ( the first try with 1/8" tubing was way too thick). I made little brown sleeves from a plastic brown lid from a styrofoam coffee cup, and I CA'd them to the adjustable top ring, so that it could slide around on the bottom base ring (painted golden brown). I then slid the top adjustable ring onto the base ring. |
|
