| Hangar |
Aircraft |
Category |
Date |
Preview |
| pfinn | Shortys Basement BV-215 | Reference | 15-Nov-09 22:17 | 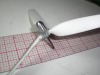 | | Views : 895 | | Hamton Standard Hydramatic. These are the "S" telescoped, square cutoff.http://www.enginehistory.org/Propellers/HamStd/hamstd.htm |
| pfinn | Shortys Basement BV-215 | Reference | 15-Nov-09 22:12 | 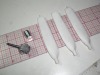 | | Views : 817 | | Hey John O, these are the "Fatties" I dd for the Tigercat. I'll be making blades for all the hubs I'm doing. These are 1/24 scale. I could bump up the blades for your size hubs if you like. I contacted DD and he said he was fine with it. But if you'd like some David Duckett originals, I Totally understand that too. Phil |
| pfinn | Shortys Basement BV-215 | Reference | 11-Nov-09 22:28 |  | | Views : 772 | | Lake Casitas,Pacific Ocean, Channel Islands. |
| pfinn | Shortys Basement BV-215 | Reference | 07-Nov-09 18:05 | 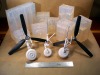 | | Views : 954 | | Well, JohnG, beat you to it! These are in the hands of JohnG. Eight molds for this particular set plus the turned aluminum spinner parts. Took a little while with three hours here and there and a couple of good work days, but they're finished. The .045 dia. wire and aluminum shafts are inmolded as well as the wheel bearings that slip/press into the wheels. I used some pigment in the prop blades and hubs but as the resin cures white, the blades are not quite black, but are a good base for a black paintjob. |
| pfinn | Shortys Basement BV-215 | Reference | 06-Oct-09 01:11 | 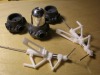 | | Views : 836 | | Happy parts. |
| pfinn | Shortys Basement BV-215 | Parked | 28-Sep-09 14:57 | 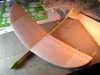 | | Views : 743 | | I'm trying a video link. |
|
| Hangar |
Aircraft |
Category |
Date |
Preview |
| pfinn | Shortys Basement BV-215 | Reference | 08-Sep-09 02:53 | 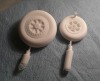 | | Views : 839 | | Fresh out of the mold. |
| pfinn | Shortys Basement BV-215 | Reference | 08-Sep-09 02:51 | 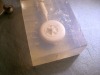 | | Views : 802 | | "Look Ma, no "Flashing"!" |
| pfinn | Shortys Basement BV-215 | Reference | 08-Sep-09 02:48 | 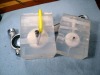 | | Views : 781 | | Pulled them out of the pot after about 30 min. still have to wait at least another 30 min. to demold. The waiting game. Tic Toc...Tic Toc. Don't remove too early, They will deform. |
| pfinn | Shortys Basement BV-215 | Reference | 08-Sep-09 02:43 | 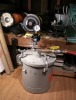 | | Views : 783 | | Another must for proper castings. After injecting resin into th molds (Gotta work fast, this stuff has a 2 minute working time!), immediately place in a pressure pot at about 80 psi (pressure pots' limit). This step gets " The liquid resin into all the nooks and crannies"! |
| pfinn | Shortys Basement BV-215 | Reference | 08-Sep-09 02:36 | 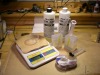 | | Views : 765 | | Ready to cast. I recieved this urethane resin from DD. Very thin withou too much shrinkage. I "Like" it. The 3m Flexi Bandage tape worked out well to hold the mold halves together. Rip off a length then tear strips off at desired width. 1/4", 1/8", no.problem. This replaced the rubber bands I forgot. Glad I did, the tape worked much better! Another "Fortunate Mistake". |
| pfinn | Shortys Basement BV-215 | Reference | 08-Sep-09 02:26 | 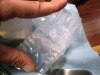 | | Views : 814 | | Plunge cut a Zig-Zag pattern for the outer edges (for registering the mold halves) with a chisel point blade. A sharp no.11 to the pattern. This is one way to do the parting. It's much quicker than making two separate halves with two mold castings. Ugly as sin but it does yield excellent results with an almost invisible part line. |
|
