| Hangar |
Aircraft |
Category |
Date |
Preview |
| rayl | Scratch Built Consolidated XF-92A | Reference | 27-Feb-15 09:40 | 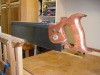 |
| Views : 469 |
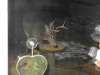
| I was feeling burnt out on the XF-92 last week, so decided to catch up on other projects. A freind had brought over a old back saw for me to refurbish. I eneded up keeping the folded spine and replacing the saw plate with some 0.032" spring steel and makinig a new handle out of some localy harvested Black Walnut. |
| rayl | Scratch Built Consolidated XF-92A | Build | 25-Feb-15 07:44 | 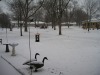 |
| Views : 481 |
| Yesterday, it was in the upper 40's. Motorcycles were out and what was left of the snow melted. Today: Blizzard warning with 10" expected, all the schools closed and (-) 16 deg for tonight. The old saying in Iowa: "If you don't like the weather just wait an hour it will change". GErturde and Heathcliffe are once again bemoaning the fact that they did not head to warmer climes. |
| rayl | Scratch Built Consolidated XF-92A | Build | 23-Feb-15 12:24 | 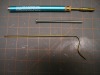 |
| Views : 477 |
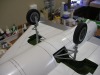
| The best way to bend brass tubing is to anneal it it first by heating until it is just starts to turn a dull red, let cool then slip the spring over the tubing and (within limits) bend away. Aluminum tubing is soft enough to bend without any annealling. The little butane torch at the top was purchased from Menards: $6.00 for the torch and $5.00 for a life-time supply of Butane in a aerosol can. |
| rayl | Scratch Built Consolidated XF-92A | Build | 23-Feb-15 12:19 | 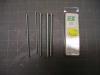 |
| Views : 455 |
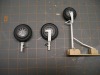
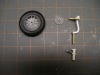
| DonC and all: This is a set of bending springs from K&S (the folks that make brass tubing) that I use to bend shapes. the set ia available at your LHS or Hobby Lobby. It can be used on tubing from 1/16" to 3/16" O.D. (I don't think that you can find it for $1.75 anymore however. |
| rayl | Scratch Built Consolidated XF-92A | Build | 19-Feb-15 13:11 | 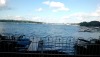 |
| Views : 484 |
| David; In warmer times, we hang out a Lake Okoboji, about 15 miles north. It is one of two "Blue Water" lakes, the other being Lake Geneva in Switzerland. Deep and cold! |
| rayl | Scratch Built Consolidated XF-92A | Build | 19-Feb-15 11:33 | 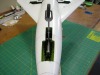 |
| Views : 440 |
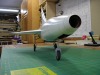
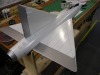
| Nose gear and well. BTW: yesterday was day of frustration and "Blue Haze" in the workshop. The Rapidogrph knock-off pens that I mentioned earlier not only don't work well on glossy surfaces, but don't dry either. After manhandling the plane to finish the panel lines, I found smudges, runs and fingerprints all over. I spent the better part of the afternoon with Q-tips and various cleaning fluids trying to repair the damage. I finally ended up using a Sharpie "Ultra fine poiint" laundry pen to finish the job. I had always planned on using some pastels to simulate the many rivet lines visable on the real plane, so maybe I can camoflauge some of the damage. Drat!!! |