| Hangar |
Aircraft |
Category |
Date |
Preview |
| jerry campbell | AZUR IAR-81C (1/32) | Build | 21-Sep-14 07:08 | 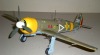 | | Views : 812 | | After the Dullcoat has dried the canopy mask is removed and the guns, pitot tube and nav light on the wintips have been installed. |
| jerry campbell | AZUR IAR-81C (1/32) | Build | 21-Sep-14 07:03 | 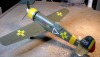 | | Views : 793 | | The decals are finished, spinner and prop is temp in place and the rudder red has been touched up, |
| jerry campbell | AZUR IAR-81C (1/32) | Build | 21-Sep-14 06:56 | 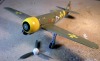 | | Views : 874 | | Decaling is finished, next is a coat of Testors Dullcoat. |
| jerry campbell | AZUR IAR-81C (1/32) | Build | 21-Sep-14 06:53 | 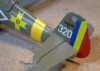 | | Views : 844 | | The Azur provided decals are very delicate and slide off the paper faster than any decals I've ever worked with, emerse them in water for seconds not minutes. They also stick very quickly so place them carefully when sliding off the wet paper. The rudder decal is a bit short so there must be some red touch up. |
| jerry campbell | AZUR IAR-81C (1/32) | Build | 21-Sep-14 06:40 | 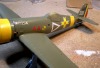 | | Views : 811 | | Spaying the model with Future floor polish (Klear in the UK) provides a glossy surface to which the decals will adhere to. |
| jerry campbell | AZUR IAR-81C (1/32) | Build | 15-Sep-14 13:50 | 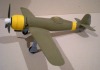 | | Views : 943 | | The lower blue Geman light blue with a little more blue added. |
|
| Hangar |
Aircraft |
Category |
Date |
Preview |
| jerry campbell | AZUR IAR-81C (1/32) | Build | 15-Sep-14 13:47 | 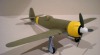 | | Views : 911 | | I am pleased with the olive green that I mixed with Tamiya flat acrylic. |
| jerry campbell | AZUR IAR-81C (1/32) | Build | 15-Sep-14 13:44 | 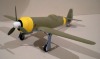 | | Views : 882 | | The basic paint is finished and the cowl is in place. The spinner and blades are temporarily in place. |
| jerry campbell | AZUR IAR-81C (1/32) | Build | 15-Sep-14 13:40 | 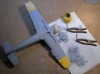 | | Views : 737 | | The painting begins, The instructions provide excellent painting refereces for the both the large and small parts. |
| jerry campbell | AZUR IAR-81C (1/32) | Build | 15-Sep-14 13:38 |  | | Views : 509 | | My engine is roughly finished to support the cowling. The side exhaust will simpley be glued in place. |
| jerry campbell | AZUR IAR-81C (1/32) | Build | 15-Sep-14 13:36 | 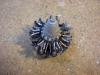 | | Views : 411 | | The engine is pretty complete, but is totally hidden in under the cowling and unless your finished kit is presented without a cowling their is no point in spending the time and effort to finish it. |
| jerry campbell | AZUR IAR-81C (1/32) | Build | 15-Sep-14 13:29 | 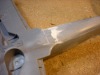 | | Views : 419 | | The lower wing joint also requires putty and sanding. |
|
