| Build Thread, Page :
[ 1 ] 2 3 (57 posts, 20 posts per page, 3 pages in total)
|
[ Next > ] |
| David Duckett, Comment for image # 3142 | 12 Jun 12 18:02 |
| Check the date of the photo :-) |
| lukebozek1, Comment for image # 3142 | 12 Jun 12 17:51 |
| Nice work Jerry. I have three of these DD kits. I found that cutting the parts out soothed my soul. Except when I broke somethink and had to repair or replace it. Looking forward to seeing "the build." |
| jgood, Comment for image # 3142 | 12 Jun 12 03:12 |
| I'm not disciplined enough to do this. I cut some out, and then have to glue them together! |
| Mr. Willson, Comment for image # 3142 | 12 Jun 12 01:52 |
| Now you just have to assemble it all.Let the fun begin! |
| BriandKilby, Comment for image # 3332 | 27 Sep 11 09:32 |
| my next build. |
| mattolson, Comment for image # 3331 | 23 Jun 07 15:24 |
| Nicely done. Good luck with the surgery. I've recently worked for a medical device company that made nerve monitoring equipment. They can really do some amazing things these days. |
| poppy, Comment for image # 3331 | 23 Jun 07 07:11 |
| Great job. Paint looks like weathered Nippon brown. Well done. Good luck w/operation. |
| jernst, Comment for image # 3331 | 23 Jun 07 05:34 |
| Nice job Jerry. Best of luck with the operation. |
| jerry campbell, Comment for image # 3331 | 23 Jun 07 00:56 |
| Xanadu the wheel collars are made by Du-Bro Cat.No. 137. They are 1/16th plated Brass Dura-Collars and come with an allan wrench. $ 1.45 for a set of 4. Should be available in most RC Hobby shops. |
| jerry campbell, Comment for image # 3331 | 23 Jun 07 00:49 |
| Thanks for the info Dave, I'll try it the next time I post a foto. Unfortunately my modeling days are over for a while. I have Urner Neuropathy and I am scheduled for surgery monday morning to move a nerve from one side of my left arm to the other side of my arm. Then it will be splints for a while and then a wrist brace. I maybe 6 to 8 weeks before I'm back at it. |
| Xanadu, Comment for image # 3331 | 23 Jun 07 00:45 |
| Very nice indeed.
What did you do for the wheel collars? Cannot tell, glue a small nut over the wire? |
| David Duckett, Comment for image # 3331 | 22 Jun 07 23:55 |
| I don't think the purists, or the color police, will mind at all. It looks fine to me.
Jerry, there's more room for comments if you'll post the picture first and then bring it up again like this. The amount of space for comments is limited when you make the initial posting of a photo. |
| jerry campbell, Comment for image # 3332 | 22 Jun 07 23:43 |
| red stripe on and use white tape for the white outlines. |
| jerry campbell, Comment for image # 3331 | 22 Jun 07 23:42 |
| without props. I just hope the purists don't get me. |
| jerry campbell, Image # 3333 | 22 Jun 07 23:31 |
I also got to learn to make scale tail wheels. |
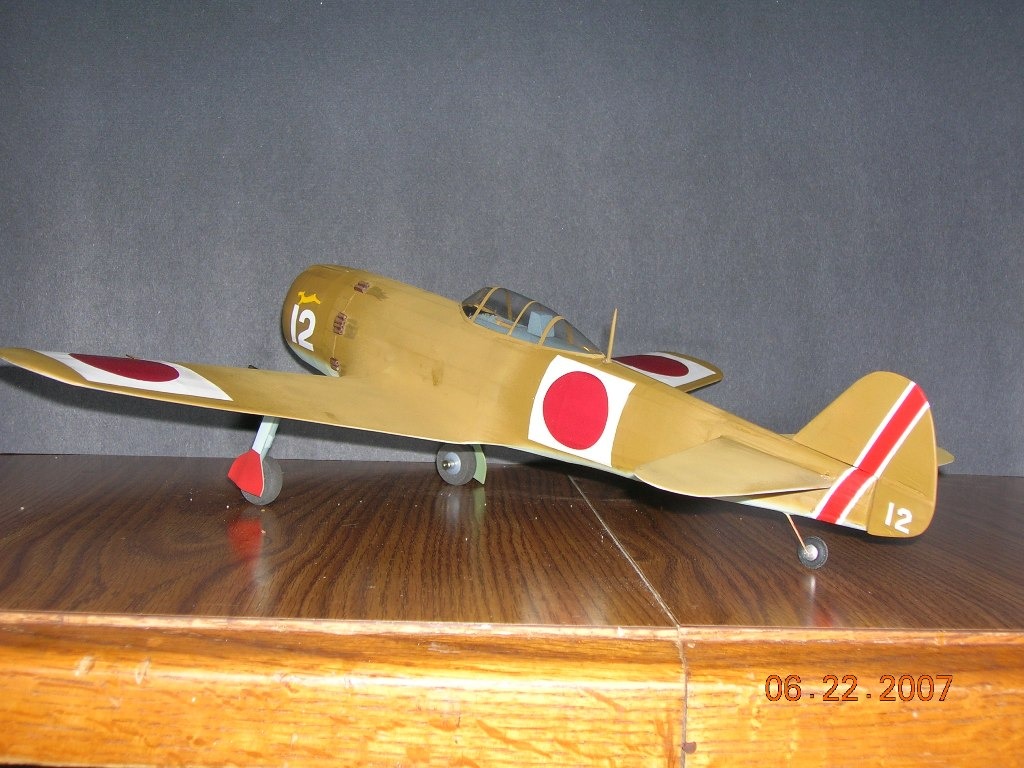
| jerry campbell, Image # 3332 | 22 Jun 07 23:19 |
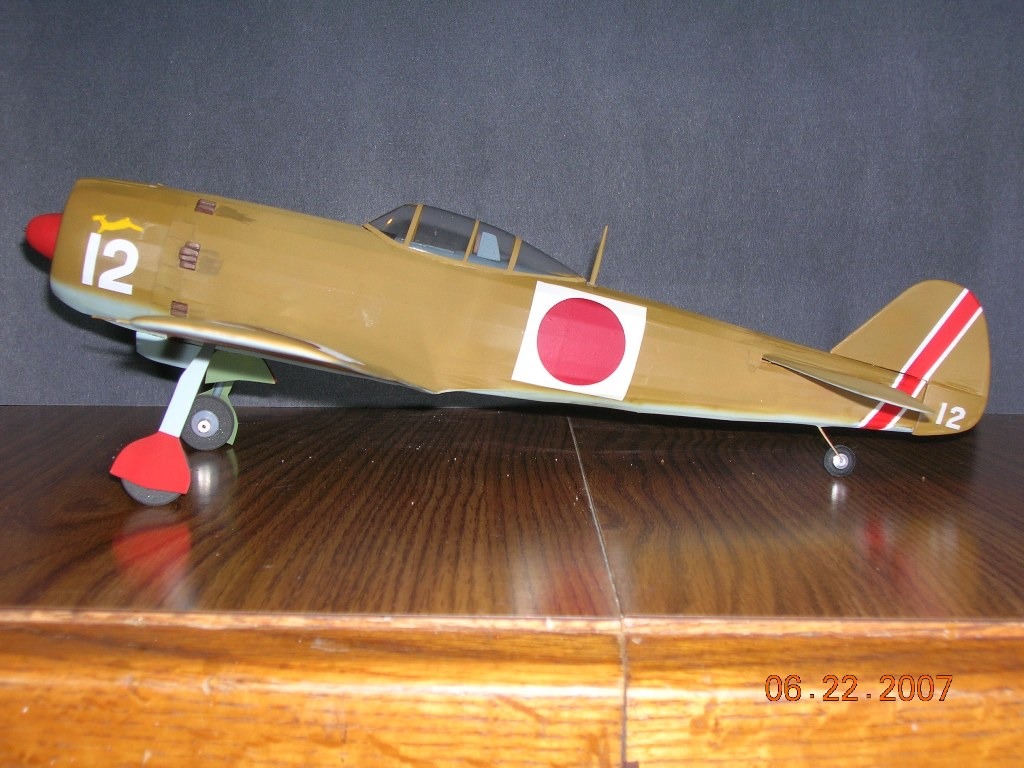
The cowling 12 came from a 1/24th scale Eagles Strike sheet while the small 12 on the tail came from a scrap sheet that was actually for American aircraft. The red and white stipe on the tail were painted on. If I had to do it over again I would paint the |
| jerry campbell, Image # 3331 | 22 Jun 07 22:59 |

Finished! The final finishing took longer than I thought it would. Diels kits are a bit of work but well worth it. The painting of markings and finding suitable numbers took some time. I've not learned to make scale props yet, I decided to do Frank witho |
| jerry campbell, Comment for image # 3315 | 20 Jun 07 18:20 |
| I usually just spray Dullcoat over the area where I sprayed the Future which is glossy. Remember Dullcoat is a lacquar base and works well over dry acryllic paint, but be careful if you are spraying Dullcoat over enamel. I'm new at using many of the products used to build stick and paper kits. Be careful, do a trial on an old model or something that will not be missed if ruined. |
| mattolson, Comment for image # 3315 | 20 Jun 07 15:13 |
| Do you spray the entire model with the Testors dullcote or just over the decals. I've never used it but I want to try it n the spitfire decals, but don't know if it will make them more obvious without coating the whole plane. |
| jerry campbell, Comment for image # 3315 | 20 Jun 07 14:11 |
| I use a Badger 150 double action airbrush hooked to a Badger 180-12 compressor and a moisture trap. I'm painting with Tamiya flat now, but in the past I've prefered using Gunze semi-gloss but the availability is not as good as Tamiya. I over spray the decal area with future floor polish to give me a glossy surface for the decals, then spray with Testors Dullcoat.
I've not started doing panel lines yet. The cooling gills are paper glued on and then a thin wash of black is lined with a fine brush. Like a scale prop, learning to use tape for panel lines is in the not too distant future. I've not been doing this very long, I've got a lot to learn. Virtualaerodrome has been a "godsend". |
| Build Thread, Page :
[ 1 ] 2 3 (57 posts, 20 posts per page, 3 pages in total)
|
[ Next > ] |
