| Hangar |
Aircraft |
Category |
Date |
Preview |
| Skyediamonds1985 | Guillows Series 200 - SE5a | Build | 19-Apr-16 20:41 | 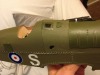 | | Views : 824 | | Really didn't want to do it, but in order to maintain a modicum of authenticity of the real aircraft, I had to "debling" the hinges by painting over them. I thinned out the paint so as to allow the hinge details shows through. |
| Skyediamonds1985 | Guillows Series 200 - SE5a | Build | 19-Apr-16 20:39 | 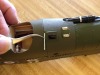 | | Views : 793 | | Used some "O" sized rivet decals also from MicroMark on the window framing. The original S.E. 5's instrument panel was located so far back deep within the recesses of the cockpit, the builders decided to cut out a window to allow sunlight shine through so the pilot could see the instruments. |
| Skyediamonds1985 | Guillows Series 200 - SE5a | Build | 19-Apr-16 20:35 | 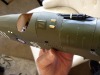 | | Views : 752 | | Also used the hinges for the top fuselage hatch. |
| Skyediamonds1985 | Guillows Series 200 - SE5a | Build | 19-Apr-16 20:34 |  | | Views : 718 | | To get the desired hinge type and scale, I had to first use a pair of dice (cutting pliers) then followed up with small modeling files. |
| Skyediamonds1985 | Guillows Series 200 - SE5a | Build | 19-Apr-16 20:32 | 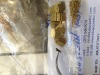 | | Views : 687 | | Blue Jacket also produces small hinges. These are the smallest they have. You can easily compare the sizes. I may use them for a larger scale model someday |
| Skyediamonds1985 | Guillows Series 200 - SE5a | Build | 19-Apr-16 20:31 | 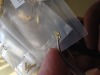 | | Views : 710 | | You can see their scale from comparing my finger and tweezers. Very inexpensive |
|
| Hangar |
Aircraft |
Category |
Date |
Preview |
| Skyediamonds1985 | Guillows Series 200 - SE5a | Build | 19-Apr-16 20:29 | 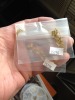 | | Views : 744 | | Purchased some very small brass hinges from MicroMark |
| Skyediamonds1985 | Guillows Series 200 - SE5a | Build | 19-Apr-16 20:28 | 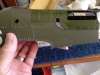 | | Views : 739 | | Finished results. The small indentations, are from my previous attempts using rub-off letters without much success. With the self-adhesive letters, the small dents are barely noticeable. The engine cover was already glued in place. So that precluded any chance of redoing the whole cover. Stuff happens.... |
| Skyediamonds1985 | Guillows Series 200 - SE5a | Build | 19-Apr-16 20:25 | 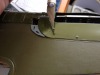 | | Views : 750 | | I carefully laid down the "holed" letters onto a sheet of paper. Using a rattle can of Temiaya Olive Drab, I sprayed the letters. After they were dried, I carefully lifted them off the sheet. Because they're self-adhesive, I simply stuck them into place. No glues, no mess. I could even relocate them into their final place, if necessary |
| Skyediamonds1985 | Guillows Series 200 - SE5a | Build | 19-Apr-16 20:19 | 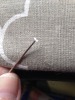 | | Views : 694 | | Used a "T" pin to poke a hole |
| Skyediamonds1985 | Guillows Series 200 - SE5a | Build | 19-Apr-16 20:18 | 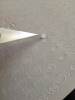 | | Views : 710 | | Obtained some self-stick vinyl letters from a local arts and crafts store. Pulled out the "O" from the centers of the letters "b." Seemed to be about the right size. |
| Skyediamonds1985 | Guillows Series 200 - SE5a | Build | 19-Apr-16 20:13 |  | | Views : 674 | | Going to replicate the small hatches holding down the engine cover |
|
