| Hangar |
Aircraft |
Category |
Date |
Preview |
| edtherenderman | Easy Built Taube | Build | 13-Jan-20 11:23 | 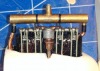 | | Views : 367 | | Engine painted, push rods added and radiator header tank installed. |
| edtherenderman | Easy Built Taube | Build | 13-Jan-20 11:22 | 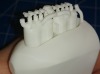 | | Views : 248 | | The other side. |
| edtherenderman | Easy Built Taube | Build | 13-Jan-20 11:22 | 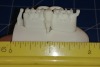 | | Views : 354 | | Here is a close up of the engine that I printed on my 3D printer. You can see the overall length is 2 inches. |
| edtherenderman | Easy Built Taube | Build | 13-Jan-20 11:20 | 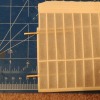 | | Views : 248 | | The plans didn’t really cover how to mount the wings, so I opted for brass tubing inserted into the wings, with slightly larger brass tubing in the fuse. I’m not worried about weight, and wanted to make sure the wings will not buckle. No problem with this solution! |
| edtherenderman | Easy Built Taube | Build | 13-Jan-20 11:18 | 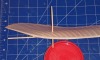 | | Views : 313 | | Here are the wing tips with 1/16” bamboo skewers that are used for the rigging. This plane has a lot of rigging. Looking forward to that! |
| edtherenderman | Easy Built Taube | Build | 13-Jan-20 11:17 | 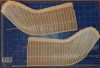 | | Views : 262 | | Been spending time working on the Taube. I’ve covered all the surfaces and doped them with EZDope. 1:3 thinned with water worked really well. Took about five coats but finally got tissue fully saturated without big globs of dope to clean up. |
|
| Hangar |
Aircraft |
Category |
Date |
Preview |
| edtherenderman | Easy Built Taube | Build | 02-Jan-20 12:30 | 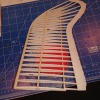 | | Views : 338 | | Here one wing seen from the root. It is a bit hard to tell, but there is a significant warp molded into the wingtip as per the plans. |
| edtherenderman | Easy Built Taube | Build | 02-Jan-20 12:30 | 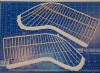 | | Views : 273 | | Here are the wings. I printed the ribs, trailing edges and wing tips on the 3D printer. The leading edge and stringers are balsa. I used CA to cement everything together, which seemed to work well. These wings are really heavy with all the plastic pieces. I can see that there are some weight savings I can do to improve it, but I think this type of construction will always be heavy. |
| edtherenderman | Easy Built Taube | Flying | 02-Jan-20 12:24 | 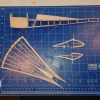 | | Views : 240 | | Here are the fuse and empennage created using traditional model techniques. |
| edtherenderman | Easy Built Taube | Build | 02-Jan-20 12:23 | 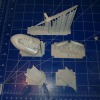 | | Views : 248 | | I also created many of the detail parts, like the engine, propeller, radiators and wheels using 3D modeling techniques. This time I used Blender and ZBrush to create the parts, and printed them out using my DLP printer. The DLP can print at .05 mm resolution, so much finer details. |
| edtherenderman | Easy Built Taube | Build | 02-Jan-20 12:23 | 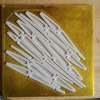 | | Views : 249 | | Started work on this Rumpler Taube (https://outerzone.co.uk/plan_details.asp?ID=11223). I’m trying several different techniques with this. First, I wanted to triple the number of ribs in the wings to more closely represent the real number of ribs in the wings. However, I didn’t want to cut that many ribs out of balsa, so I modeled the ribs in Blender, and printed them out on my 3D FDM (Fused Filament Fabrication). This picture is a bunch of the ribs after printing, but still attached to the print bed. The bed if 5” x 5”. It took a couple of attempts to get the right thickness of the ribs, and to get the hollowing correct. But that’s the magic of 3D printing, you can prototype relatively quickly and adjust as needed. The disadvantage of 3D printing is that the parts are heavier, being of plastic instead of balsa, and the FDM printer will only print to .3 mm resolution. |
|
