| Hangar |
Aircraft |
Category |
Date |
Preview |
| Skyediamonds1985 | Guillows Series 200 - SE5a | Build | 11-Jan-16 20:23 |  |
| Views : 273 |
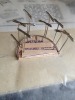
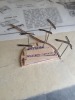
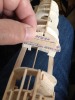
| Good afternoon fellow modelers. Today, I was focusing on the framing around the instrument panel as well as cutting out one of the bulkheads just behind where the instrument panel will be located to help fit the Vickers machine gun as well as following the scale outlines of the real cockpit interior |
| Skyediamonds1985 | Guillows Series 200 - SE5a | Build | 08-Jan-16 18:46 | 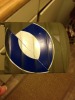 |
| Views : 371 |
| Remembering how I over sprayed the decal last time, I held the spray can away a bit more. This is the result. I liked the :soft edges from the loose masking. Another lesson learned. |
| Skyediamonds1985 | Guillows Series 200 - SE5a | Build | 08-Jan-16 18:42 | 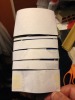 |
| Views : 330 |
| Loosely masked over the ribs with paper allowing for the pain to spray under just a bit to help give it a "soft" look. Living in a small apartment doesn't allow room for the convenience of spray guns along with compressors, air tanks, etc. This is where imagination kicks in... I think |
| Skyediamonds1985 | Guillows Series 200 - SE5a | Build | 08-Jan-16 18:39 | 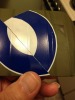 |
| Views : 335 |
| Another view of the quality of the decal over the covering. |
| Skyediamonds1985 | Guillows Series 200 - SE5a | Build | 08-Jan-16 18:37 | 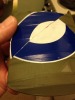 |
| Views : 278 |
| Reapplied what was left of the original decal from my first attempt. I was very happy to see the decals also conformed to the rib taping in addition to allowing the delicate weave pattern from the covering to show through. |
| Skyediamonds1985 | Guillows Series 200 - SE5a | Build | 08-Jan-16 18:34 |  |
| Views : 269 |
| Removed the previous covering . Sanded frame smooth, then recovered. The difference, is that I installed the inspection window on the Solartex while laid on top of a table. This way, I gave it a firm base to glue it in place. The other way, I cut out the Solartex after it was covered. The result was a small hold that "gave away" when pushing down the inspection window frame. Didn't get a consistent adhesive. There were some small gaps. I also decided to lay down some rib tapes and paint over them with Tamiya spray can olive drab. |