| Hangar |
Aircraft |
Category |
Date |
Preview |
| Skyediamonds1985 | Guillows Series 200 - SE5a | Build | 26-Nov-15 14:48 | 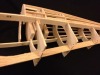 | | Views : 330 | | Underside view of the left side. In effort to maintain the prominent fuselage stitching, I'm following through from my previous "experiment" and recessing the lower fuselage formers to make room for the balsa sheeting. |
| Skyediamonds1985 | Guillows Series 200 - SE5a | Build | 26-Nov-15 14:45 | 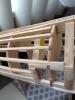 | | Views : 345 | | Close up of the baggage door behind the pilot's head rest. Its still in the rough stage. I think I manged to work out the details of the door between the fabric portion of the fuselage and the solid paneling. If you zoom up, you can see that I've recessed the forward two formers and cutting away a part of the stringers above, to allow room for balsa sheeting to simulate the paneling. Lotta head-scratching here. |
| Skyediamonds1985 | Guillows Series 200 - SE5a | Build | 26-Nov-15 14:40 | 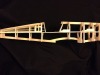 | | Views : 321 | | Adding some stringers and framing surrounding the baggage door area behind the pilot's head rest. As luck would have it, the S.E. 5 baggage door is in between the fabric and solid paneling making for some head-scratching. |
| Skyediamonds1985 | Guillows Series 200 - SE5a | Build | 26-Nov-15 14:37 | 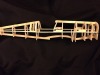 | | Views : 291 | | First off: I wish everyone a Happy Thanksgiving and good health. I'm now rough framing the fuselage. If you'll notice, I've taken the liberty of making a "few" changes from the stock fuselage such as: the general cockpit area and the addition of some thick wooden formers behind the pilot's head rest for the baggage door. |
| Skyediamonds1985 | Guillows Series 200 - SE5a | Build | 17-Nov-15 19:37 | 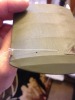 | | Views : 358 | | Here is a another perspective of the difference between the two holes. The rear is where the thread would naturally "flow" in a straight line to the "hidden pulley" inside the wing. The other hole, whereas not as natural, comes more close to resembling the details of the real aircraft. The control horn in this picture is only a representation to help give me an idea of where to puncture the hole through the covering. Only get one shot at this, might as well do a couple of "dress rehearsals" first on my practice wing. |
| Skyediamonds1985 | Guillows Series 200 - SE5a | Build | 17-Nov-15 19:32 | 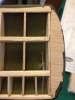 | | Views : 344 | | This is the underside of my faux sample wing where the aileron "cable" runs through. The hole nearest the rear spar is where the "cable" runs naturally through in a straight line. The second hole where the thread is coming through is the hole that more closely resembles the actual aircraft. Not totally accurate, but better than the original point of entry near the rear spar. |
|
| Hangar |
Aircraft |
Category |
Date |
Preview |
| Skyediamonds1985 | Guillows Series 200 - SE5a | Build | 17-Nov-15 19:29 | 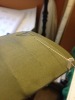 | | Views : 336 | | As with almost anything in life of modeling, adding some special detailing oftentimes comes with additional work not anticipated. Such as it is with my intentions to add the inspection window to the wing. I realize that for the window to have its true purpose, I needed to also add the pulley system inside the wing. In my previous posts, this was long accepted. What I overlooked, is that now I can only cover the (say for example) the top surface of the wing, then add the aileron rigging and pulley system, then I can cover the bottom wing. Just more fun-filled work. |
| Skyediamonds1985 | Guillows Series 200 - SE5a | Build | 17-Nov-15 15:43 | 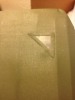 | | Views : 350 | | My fourth try at installing the inspection window on the wing surface. Turned out, I only use glue. I thought if I used a heat iron on the strips of film would set off the adhesive and stick the whole assembly to the wing surface. I also thought an added "plus" would be that the additional heat from the iron would help tauten the wing surface further. What was happening, is due to the "hole" on the surface with no wooden support caused the surrounding opening and assembly to distort. In summary, the heat-shrink films are designed for covering a frame, not for supporting any assemblies, however small or light. |
| Skyediamonds1985 | Guillows Series 200 - SE5a | Flying | 16-Nov-15 21:44 | 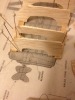 | | Views : 380 | | Here, I will also hope to alter the original shape of the kit to reflect the outlines of the original aircraft. I've lowered the bottom keel outside of the plans. I'll have to break apart some of the fuselage formers and elongate them with some extra balsa bracing on the back. |
| Skyediamonds1985 | Guillows Series 200 - SE5a | Build | 16-Nov-15 21:36 | 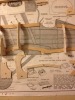 | | Views : 422 | | This is the section where I will be making some alterations to the original kit |
| Skyediamonds1985 | Guillows Series 200 - SE5a | Build | 16-Nov-15 21:35 | 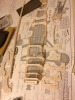 | | Views : 356 | | While continuing my trials on the wing inspection windows, I've started on the fuselage. My intent is to detail the cockpit interior as like the real airdraft |
| Skyediamonds1985 | Guillows Series 200 - SE5a | Build | 16-Nov-15 21:04 |  | | Views : 344 | | Sample wing. About to try the experiment of installing the inspection window. Hope all this experimentation pays off. |
|
