|
|
| Hangar |
Aircraft |
Category |
Date |
Preview |
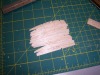
| hjlittman | Guillows Series 300 - Piper Cub 95 | Build | 06-Mar-12 16:34 | 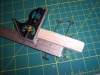 | | Views : 551 | | The rib blanks were stacked evenly and stuck together with some new, sharp, pins. If I had needed more ribs I would have glued them together with Testor's "green glue". That way, when you are done shaping and sanding you can take them apart with acetone. |
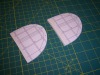
| hjlittman | Guillows Series 300 - Piper Cub 95 | Build | 06-Mar-12 16:31 | 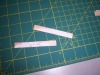 | | Views : 510 | | I use the stacked rib method for cutting ribs on constant chord wings. The rib patterns were cut out from scans of the plans, glued to heavy card stock, cut out, and glued to the rib blanks that would be on the ends of the rib stack. |
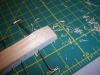
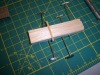
| hjlittman | Guillows Series 300 - Piper Cub 95 | Build | 06-Mar-12 16:29 | 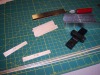 | | Views : 524 | | Since I am building "scratch" , from the plans, I need to cut out some parts. Using my balsa stripper and miter box I cut out 24 rib blanks. Since I am lightening the structure I cut only the root ribs and strut attachment ribs of 1/16" sheet. All the rest are 1/32" sheet |
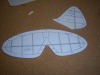
| hjlittman | Guillows Series 300 - Piper Cub 95 | Build | 06-Mar-12 16:26 | 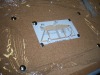 | | Views : 587 | | Building the redrawn cabin sides. |
| hjlittman | Guillows Series 300 - Piper Cub 95 | Build | 06-Mar-12 16:26 | 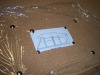 | | Views : 548 | | The next thing was to re-draw the cabin side, part "H", so that I would have the L-4 greenhouse cabin. |
| hjlittman | Guillows Series 300 - Piper Cub 95 | Build | 06-Mar-12 16:24 | 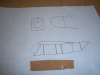 | | Views : 583 | | I'm building another 300 Series Super Cub, but this time it's kit bashed into an L-4 Grasshopper for the Blacksheep Squadron "Grasshopper Challenge" on March 17th. Actually, any plane that had an "L" designation is eligible, and my Air Force Beaver is Ok (L-20), I thought this one would fly even better. I found reliable drawings of the L-4, traced the critical sections, the nose and greenhouse cabin, enlarged them to the proper scale, printed them on tracing paper, and layed them over the Guillow's plans to see if the kit bash was possible. The nose ended up with exactly the same length (moment) so I went ahead with my project. |
|