| Hangar |
Aircraft |
Category |
Date |
Preview |
| edtherenderman | Scratch Built McDonnell XP-67 | Build | 13-Dec-20 20:11 | 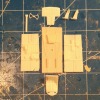 | | Views : 241 | | Weathers getting cold and wet in the PacNW so started working on the XP-67 again. I modeled the cockpit using Blender and printed out on my 3D printer. Photo references are really hard to find. I was able to find three photos on the internet. One is of the left side of the cockpit. One is looking forward ¾ view from right to left so that you can see some of the left side and the dash board. The other is from to top showing the dashboard, floor boards, rudder pedals and a little of the sides. I could not find photos of the right side or the seat. So I use contemporary aircraft (P-38 and P-47) as references. |
| edtherenderman | Scratch Built McDonnell XP-67 | Build | 26-Oct-20 10:58 | 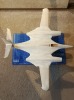 | | Views : 300 | | Starboard Side View |
| edtherenderman | Scratch Built McDonnell XP-67 | Build | 26-Oct-20 10:58 | 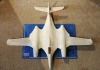 | | Views : 306 | | Here is the fuse with wing tips and tail feathers installed. Still have a little more filling/sanding to do, but pretty close to applying tissue. |
| edtherenderman | Scratch Built McDonnell XP-67 | Build | 26-Oct-20 10:56 | 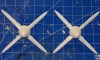 | | Views : 216 | | Also modeled and printed propellers and spinners. The XP-67 went through a lot of versions on the two prototypes built. They had a lot of problems with engine cooling and eventually had to use “Cuffed” propellers to get more airflow into the wing leading edge intakes. I decided to model one of the later versions that used the cuffs. |
| edtherenderman | Scratch Built McDonnell XP-67 | Build | 26-Oct-20 10:54 | 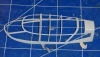 | | Views : 254 | | Update on work done over the last couple of weeks. Modeled and printed the canopy framework. This is VERY fragile, but should look really good once on the aircraft. |
| edtherenderman | Scratch Built McDonnell XP-67 | Build | 09-Oct-20 08:50 | 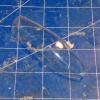 | | Views : 373 | | I also 3D modeled and printed the canopy. This is the first time I’ve tried printing with clear resins in my DLP printer and I ended up doing three prints before I figured out the configuration and parameters needed to get a successful print. As it was, it took 13.5 hours to print and it isn’t transparent coming out of the printer. This image is of the canopy after spending about two hours wet sanding with 600 to 1500 grit paper, then moving to rubbing and polishing compound, finishing with composite headlight lens cleaner (Mother’s brand). I still have to print the frames that will sit on top of the clear glazing. That’s next. |
|
| Hangar |
Aircraft |
Category |
Date |
Preview |
| edtherenderman | Scratch Built McDonnell XP-67 | Build | 09-Oct-20 08:44 | 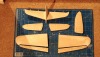 | | Views : 258 | | Before I left for Alaska for a Fly Fishing trip for Coho a couple of weeks agao (brought back 25lbs of fish – very fun trip!) I started doing some more work on the XP-67. I sheeted the outer wings and tail feathers, and build the Ailerons, Rudder and Elevators using 1/32 sheet balsa with ribs added and sanded. When I got back, I covered the movable surfaces with tissue. Still need final trim and fill coats of EZE-DOPE. |
| edtherenderman | Scratch Built McDonnell XP-67 | Build | 08-Sep-20 08:12 | 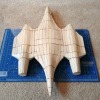 | | Views : 351 | | Bottom |
| edtherenderman | Scratch Built McDonnell XP-67 | Build | 08-Sep-20 08:12 | 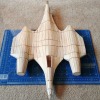 | | Views : 324 | | Been a while since I posted. Summer has kept me busy in other ways, but weather is starting to turn and getting back inside to build models. XP-67 fuse infill! What a chore. Just about every piece has to be sanded and shaped to fit. Lots of soaking and twisting to get the right contours. I also had to add several stringers between the main body and the engine nacelles, and the nacelles out to the wing base. It took about two weeks of evenings, full day Sunday and close to three sheets of 3/8” x 3” x 36” balsa to get it fully infilled. Lots of sanding and filling next. Then on to the wings, fin and horizontal stab. |
| edtherenderman | Scratch Built McDonnell XP-67 | Build | 24-Jul-20 08:25 | 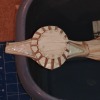 | | Views : 362 | | Front view of the starboard nacelle. |
| edtherenderman | Scratch Built McDonnell XP-67 | Build | 24-Jul-20 08:24 | 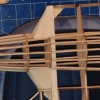 | | Views : 304 | | Bottom view of the Port air intakes. |
| edtherenderman | Scratch Built McDonnell XP-67 | Build | 24-Jul-20 08:23 | 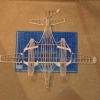 | | Views : 331 | | Fuse is mostly framed. I may still need to add some more stringers depending on how the infill goes. Note the cooling intakes on each side of the nacelles at the wing root. I modeled these in 3D and printed out on my FDM (Fused Deposition Modeling) printer. Not as high detail as I get with the DLP (Digital Light Processing) printing, but I don’t need the high resolution for this application. Plus, the FDM printer is using ABS plastic, which I can sand easily, and use acetone to smooth afterwards. |
|
