| Hangar |
Aircraft |
Category |
Date |
Preview |
| rayl | Scratch Built Consolidated XF-92A | Build | 09-Feb-15 10:24 | 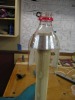 |
| Views : 408 |
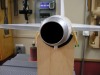
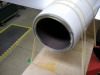
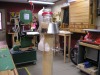
| I had a little time in the shop yesterday while the LOML was shopping, so I thought that I would do another "Shrinky-Dink' for the Afterburner tail piece. Here is the portion of the Coke bottle over the form before applying heat to it. |
| rayl | Scratch Built Consolidated XF-92A | Build | 07-Feb-15 13:40 | 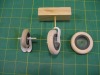 |
| Views : 484 |
| Dosen't look like a full 2 days work does it? BTW; when I said that I was machining the parts, it was all done with standard, i.e. full size, turning gouges and machinist files to work down to the final size. |
| rayl | Scratch Built Consolidated XF-92A | Build | 07-Feb-15 13:37 | 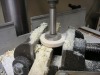 |
| Views : 553 |
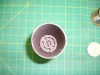
| Drilling the center of the tire out. (Looks like a shot from Fine Woodworking doesn't it?) |
| rayl | Scratch Built Consolidated XF-92A | Build | 07-Feb-15 13:36 | 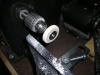 |
| Views : 462 |
| Turning the wheels out of Basswood on the lathe. |
| rayl | Scratch Built Consolidated XF-92A | Build | 07-Feb-15 13:34 | 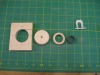 |
| Views : 486 |
| While I'm waiting for the Gloss White paint to dry: I always try to let white sit for a least a week before I touch it, I started to work on the Landing gear. The progression from left-tp-right: (1) Cut out the shape on the jig-saw, (2) establish the shape of the tire on the lathe, (3) drill the hub hole out to finish the tire, (4) machine the hub to size out of "black" PVC pipe, (5) machine the Hub disc out of 3/16" plexi. The Nose Gear yoke above was assembled during our last snowstorm, all out of styrene. |
| rayl | Scratch Built Consolidated XF-92A | Build | 29-Jan-15 12:37 | 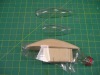 |
| Views : 524 |
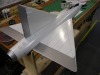
| SO, here are the three sections of the canopy for the XF-92A. I need to trim them all to fit. One thing that I should have done was lay out the section lines right on the master to give me a guide for cutting them. I know that I have probably forgotten to put in some information, so if you have a question; feel free to ask. |