| Hangar |
Aircraft |
Category |
Date |
Preview |
| rayl | Scratch Built Consolidated XF-92A | Build | 29-Jan-15 12:21 | 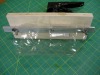 |
| Views : 426 |
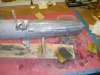
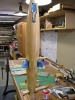
| THis is the top side of the rig. The piece od aluminam strap is to keep tension on the 2 liter bottle as the forming process progresses. I ussed a a couple 1/2" X 20 carriage bolts with wing nuts to allow for easy removal and installation. See how the (open-ended) bottle is clamped to the ply? |
| rayl | Scratch Built Consolidated XF-92A | Build | 29-Jan-15 12:17 | 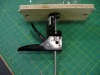 |
| Views : 435 |
| I thought that I would share a method for forming canopies (or any other shape that you might want to mould) out of a 2 liter softdrink bottle. This is the apparatus that I duplicated from "ModelMaster 2001" over on the RC Groups forum. It is a el-cheapo caulk gun mounted to a piece of 3/4" ply. I shortend the caulk gun body by about 4 inches to make sure that I had enough stroke to keep the form tight to the plastic when heat is added. |
| rayl | Scratch Built Consolidated XF-92A | Build | 29-Jan-15 10:14 | 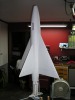 |
| Views : 448 |
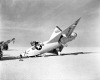
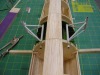
| Moby Dick on a stick! After much angst and hand-wringing, I'm going with the White color scheme that it last flew in. I just didn't want to get invovled with the natural metal or foil hassle. While the paint is curing, I'll start on the cockpit. Later. |
| rayl | Scratch Built Consolidated XF-92A | Build | 25-Jan-15 16:17 | 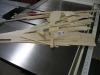 |
| Views : 523 |
| Gathered up most of the scrap wood today. Looks like I've got enough material to start to make another fairly good-sized model. (Maybe a 1/16 F-82 or even a Bamboo Bomber. Hmm. |
| rayl | Scratch Built Consolidated XF-92A | Build | 25-Jan-15 16:12 | 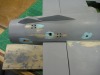 |
| Views : 489 |
| In the groove today. Neil Young playing on the box and a little Chivas (might explain being mellow). Doing fiddly stuff like making all of the vent holes and scoops/dumps in the after-burner section and the tail bumper. So, the next thing will probably be to finish the landing gear, which for some reason, I just don't want to get invovled in. |
| rayl | Scratch Built Consolidated XF-92A | Build | 21-Jan-15 11:10 | 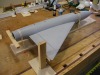 |
| Views : 517 |
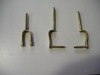
| All primed and ready to move on. Attaching the Stbd wing here. Checked the incidence with the "Wixey" meter and made a jig to keep the wingtips in line. |