| Hangar |
Aircraft |
Category |
Date |
Preview |
| rayl | Scratch Built Consolidated XF-92A | Build | 10-Jan-15 10:08 | 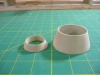 |
| Views : 425 |
| After a cup of coffee and muttering a few choice phrases, I tried my luck on the lathe again: success! I had to laminate a poplar wood blank to make the Afterburner cone due to it's height. Turned out pretty good if I say so myself. THese will be attached later after all the planking is completed and the Exhaust duct/flame-holder has been fabricated and installed. |
| rayl | Scratch Built Consolidated XF-92A | Build | 10-Jan-15 10:00 | 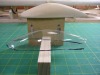 |
| Views : 453 |
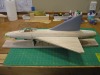
| The finished master with my first attempt at forming the canopy. This is a totaaly new process to me: SLip the form into a soft-drink 2 liter bottle that has been cut off at both ends then apply heat from a heat gun and teh plastic magically shrinks the shape of the master. Cool! |
| rayl | Scratch Built Consolidated XF-92A | Build | 10-Jan-15 09:57 | 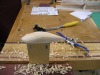 |
| Views : 400 |
| Next project is to carve the master for the canopy. I used Basswod that I picked up at the local big-box home improvement store. This is a progress shot about a 1/2 hour into the process. |
| rayl | Scratch Built Consolidated XF-92A | Build | 10-Jan-15 09:54 | 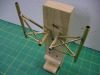 |
| Views : 453 |
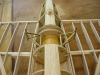
| Here are completed main gears. They need to be cleaned up a little now. The grand plan is to leave these in this form until I have them mounted in the airframe and trued up then I will guzzie them up with plastruct tubing and othe do-dads to give them the correct appearance. |
| rayl | Scratch Built Consolidated XF-92A | Build | 10-Jan-15 09:49 | 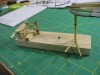 |
| Views : 374 |
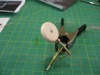
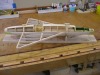
| It's getting interesting now. The main L/G of this A/C has a main support axle with 4 struts attaching it to the oleo strutt. Each of the strutts is at a different angle and lenght. I made the jig shown to be able to make sure that the gears are identical. The gears are made of various sizes of brass tubing silver solderd together. |
| rayl | Scratch Built Consolidated XF-92A | Build | 09-Jan-15 13:12 | 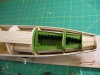 |
| Views : 512 |
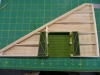
| Here is the nose gear well that has been fabricated within the inlet duct. It has been really hard to find good detail photos of some areas of the A/C, so there ia a little "Imagineering" going on here. I also laid on five planks on the bottom of the fuse to keep everything lined up. I did not want to apply any more planks that this as I need to keep the main L/G well area open for fabrication. |