| Hangar |
Aircraft |
Category |
Date |
Preview |
| LASTWOODSMAN | Scratch Built Curtiss Pusher | Parked | 31-Jan-17 11:55 | 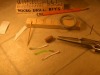 | | Views : 285 | | The green masking tape templates were then cut out with little curved cuticle scissors, and the two masking tape pieces will be used to mark the little dashes every 22.5 degrees onto the masking tape for the 16 spokes. |
| LASTWOODSMAN | Scratch Built Curtiss Pusher | Parked | 31-Jan-17 11:51 | 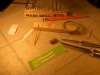 | | Views : 274 | | The curved cuts on the two printer paper templates were made to match the contour of the hub. The two finalized paper templates were then scotch-taped onto a piece of green marking tape. |
| LASTWOODSMAN | Scratch Built Curtiss Pusher | Parked | 31-Jan-17 11:48 | 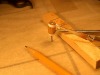 | | Views : 288 | | I cut and recut two templates out of printer paper to use to locate the dashed spoke hole gradient location marks on the wheel hub. Here they are held in place by two tweezers to check the fit to the hub. |
| LASTWOODSMAN | Scratch Built Curtiss Pusher | Parked | 31-Jan-17 05:48 | 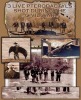 | | Views : 327 | | Several Pterodactyls were shot during the Civil War in the United States. The giant Thunderbird also still llives in the United States. |
| LASTWOODSMAN | Scratch Built Curtiss Pusher | Parked | 31-Jan-17 05:46 | 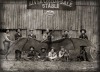 | | Views : 363 | | This Civil War Pterodactyl proves their existence. The Wright Brothers and Glenn Curtiss both studied animal flight. Russian scientists have studied this photo and found it to be authentic! |
| LASTWOODSMAN | Dumas Kit #238, Spad VII | Parked | 28-Jan-17 21:19 | 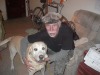 | | Views : 662 | | Image Comments LASTWOODSMAN [ edit ] 18-Nov-16 15:08 Me and my bird dog "Trapper". I'm 60 and he is 6 years old.I was born in 1956 and buuilt and flew control line balsa models when I was a kid with cox .049 and .020 engines, smashing them up, building them again, fllying them, smashing them up over and over - we had great fun when we were kis. I sstopped at 15 and then at 45 years old in 2001 I built a guillows Fokker triplane. Then 15 more years later in 2013 - three years ago I got back into the hobby thanks to all of you most inspiriing guys on Virtual Aerodrome. To dat I have 20 models on the wall. Special thanks to James Good for the website, masterbuilder David Ducket, Poppy, John Oshust and all the rest of you great builders and historical researchers. Thank you for all your tips and builds. When I need my relaxation therapy I just sit back and watch your builds. rayl 18-Nov-16 19:29 A belated welcome to the VA group! We DO have a great bunch of folks here. Looks like a rouges' gallery of great thinkers on your workshop wall, for inspiration I presume:-), LASTWOODSMAN [ edit | delete ] 18-Nov-16 21:28 Thanks for the welcome rayl. Those head bust pics on my apartment wall are 31 of the greatest classical music composers of all time, and I play pieces from each one of them on my piano accordion. David Duckett 19-Nov-16 07:48 Thanks for the nod. Welcome. Don C 19-Nov-16 11:00 Welcome and nice covering job on the Spad. Good looking pooch too. LASTWOODSMAN [ edit | delete ] 19-Nov-16 17:13 I forgot the most important point about the 3 color camo scheme - when you trace the outline of the wings, trace in the rib widths also and make your squiggly line separations of the different color tissue panel overlaps, to be wavering over the rib (or fuselage former for that matter) back and forth, in order to better support the tissue parts sticking out in mid air away from the rib tops - the tissue won't sag as much when you brush on that 1/8" overlap with 50-50 glue water mix. LASTWOODSMAN [ edit | delete ] 20-Nov-16 21:33 Thanks for the welcome DonC and Bill Parker for making me feel right at home! poppy 21-Nov-16 15:17 Welcome to a great site. Hope you enjoy it and look forward to some of your builds. |
|
| Hangar |
Aircraft |
Category |
Date |
Preview |
| LASTWOODSMAN | Scratch Built Curtiss Pusher | Parked | 28-Jan-17 15:56 | 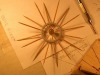 | | Views : 380 | | Now i have to "lay out", and make, the Mortise hole locations on the hub, where the toothpic spokes are inserted. |
| LASTWOODSMAN | Scratch Built Curtiss Pusher | Parked | 28-Jan-17 15:53 | 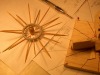 | | Views : 263 | | The wheel rim sharp corners were then sanded by Dremel with 120 grit sanding bands on the Dremel 1/4" Drum Sander. Then I fine sanded everything with 320 grit paper by hand. |
| LASTWOODSMAN | Scratch Built Curtiss Pusher | Parked | 28-Jan-17 15:45 | 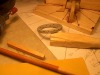 | | Views : 251 | | The #59, 0.041" felloe holes in the wheel rim were then chased enlarged with a 1.5 mm (0.0565") bit, then a #50 - 0.0695" bit, then a 5/64" 0.0781" bit, and finally a 3/32" 0.0938" bit using a pin vise. I wish I had a drill bit between 5/64" and 3/32" - ie an 11/128" 0.0859" drill bit, which would have been a more perfect, tighter fit, for the 0.080" diameter spokes - next time ... |
| LASTWOODSMAN | Scratch Built Curtiss Pusher | Parked | 27-Jan-17 15:47 | 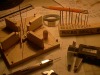 | | Views : 266 | | The holes already drilled into the rim were from a 0.041" #59 drill bit and Pin Vise. Since the hardwood toothpic spokes are about 0.086" in diameter, I will now chase each one of these 16 holes up to 3/32" or 0.0938" holes for the spokes to have some "wiggle" room in order to attach into the hub holes yet to be made. |
| LASTWOODSMAN | Scratch Built Curtiss Pusher | Parked | 27-Jan-17 15:28 |  | | Views : 261 | | This is the greater angle of "Felloe" hole through the wheel rim, for the other side of the wheel to provide a "deeper" dish. I used a smaller 4.4 mm spacer under the hub. In this way, the spokes should, I hope, attach to the hub at equal distances from the hub ends. |
| LASTWOODSMAN | Scratch Built Curtiss Pusher | Parked | 27-Jan-17 15:22 |  | | Views : 273 | | This will be an "Assymetrical Dish" 16 wooden spoke wheel. This is the shallower angle of the "Felloe" holes in the wheel rim to provide the "shallower" dish side of the wheel. I used an 8.6 mm spacer under the hub to raise the hub to the correct level, slid on the hub, sllid a 1/8 " location pressure holding support tube on top of the hub with a small square balsa pressure plate on top of that to make everything secure. |
|
