| Hangar |
Aircraft |
Category |
Date |
Preview |
| edtherenderman | Guillows Series 200 - Rumpler C5 | Build | 29-Aug-21 21:54 | 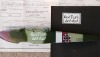 | | Views : 359 | | I found the “Good People Don’t Shoot” script when researching the Rumpler C4 on Wingnutwings.com. Instead of trying to create a decal for this, I created a stencil in Blender, which I then 3D printed. I had to do a little touch-up but was pretty easy. You will also see zig-zag lacing on the fuse sides. This aircraft had canvas side panels that could be opened on the ground by removing this lacing that held it in place. Interesting detail that I though really adds to the realism. I used ABS material extruded from my 3D printer. |
| edtherenderman | Guillows Series 200 - Rumpler C5 | Build | 29-Aug-21 21:49 | 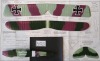 | | Views : 355 | | More paint and decals. I created the decals in my usual way, Photoshop, inkjet print onto waterslide decal sheets and overcoat with clear gloss acrylic. The upper surfaces and the fuse have all be sprayed with rattle can satin finish. |
| edtherenderman | Guillows Series 200 - Rumpler C5 | Build | 23-Aug-21 10:52 | 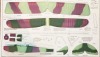 | | Views : 420 | | Rumpler went into the paint rack for initial color coats. Used white rattle-can primer on all surfaces, then combination of Vallejo Model Air (Dark Green) and Army Painter - Warpaints (Light green and Mauve). The Mauve did not cover well. I needed to thin it to get it through the airbrush, but then it wouldn't cover. So it took four to five coats! The Light green when on fine with a little thinning. I had issues with the Model Air too, but I think that was dried lumps in the paint that I couldn't filter out. I've had that paint for awhile so I suspect that's the problem. Took a lot of airbrush cleaning to keep it going. I still haven't painted the bottoms (light sky blue). Once I have that, it will be time for decals and details. |
| edtherenderman | Guillows Series 200 - Rumpler C5 | Build | 13-Aug-21 11:59 | 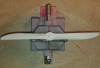 | | Views : 214 | | Close up of propeller. I was originally going to use an AXEL style, which I had already 3D modeled for the Hannover, but after printing it decided to change to a HEINE brand, which meant that I had to model that one. Fortunately, I had modeled the hub separately and was able to reuse it. I ended up printing four propellers for this. The first print failed, the second was the AXEL, the third looked good, but I realize I reversed the rotation direction, so flipped it and printed a fourth, which you see here. This is printed at 50 microns and took over 9 hours to print. |
| edtherenderman | Guillows Series 200 - Rumpler C5 | Build | 13-Aug-21 11:26 | 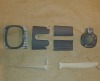 | | Views : 173 | | Still working slowly on the Rumpler. Here are pictures of fresh prints. Combings and engine cowlings are printed on the FDM 3D printer using a material called Polysmooth, which prints like PLA plastic, but can be smoothed with isopropyl alcohol. They have been sprayed with Auto Sanding primer. Still need to wet sand the engine cowlings. The propeller was printed on my DLP 3D printer. It had to be printed in too parts because my print bed isn't large enough. |
| edtherenderman | Guillows Series 200 - Rumpler C5 | Build | 19-Jul-21 14:05 | 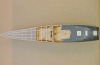 | | Views : 237 | | Underside. The panels and hatches are done with .005mm polystyrene. |
|
| Hangar |
Aircraft |
Category |
Date |
Preview |
| edtherenderman | Guillows Series 200 - Rumpler C5 | Build | 19-Jul-21 13:51 | 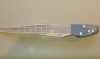 | | Views : 269 | | Starboard side of fuse. Front 1/3, and the turtle deck are infilled. For the turtle deck, I used my old method of sand, fill, cover is tissue and dope. The filled, sanded, then put EZ-Dope right on the wood. Wet sanded that, then used auto sanding primer. Wet sanding that and got a really nice finish. |
| edtherenderman | Guillows Series 200 - Rumpler C5 | Build | 19-Jul-21 13:48 | 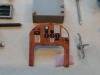 | | Views : 241 | | Close-up of the dashboard. The main fuel tank is behind it. The pilot’s seat is right on top of the tank. Makes you really appreciate how brave these young men were to get into an airplane made of wood and canvas, which really wouldn’t stop a bullet, then sit on top of a fuel take full of gasoline, and no parachute! |
| edtherenderman | Guillows Series 200 - Rumpler C5 | Build | 19-Jul-21 13:44 | 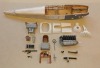 | | Views : 345 | | Been working slowly on the Rumpler. Summer is hard with all the outside activity and nice weather, but making progress. Here is a picture of almost all the 3D printed parts painted along with the fuse with completed infill and silk span. I got a new 3D printer a few months ago and am trying out some new filament called PolySmooth that you can smooth with Isopropyl Alcohol. Easier to print then ABS and don’t have to inhale Acetone for hours. The front combing, engine cowling and nose are done it that material. So far, so good. |
| edtherenderman | Guillows Series 200 - Rumpler C5 | Build | 20-Jun-21 19:32 |  | | Views : 288 | |
| edtherenderman | Guillows Series 200 - Rumpler C5 | Build | 20-Jun-21 19:31 |  | | Views : 283 | |
| edtherenderman | Guillows Series 200 - Rumpler C5 | Build | 20-Jun-21 19:31 |  | | Views : 251 | |
|
