| Hangar |
Aircraft |
Category |
Date |
Preview |
| edtherenderman | Scratch Built Bugatti 100P | Build | 14-Nov-21 19:45 | 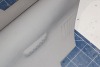 |
| Views : 216 |
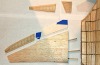
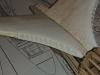
| Port side exhaust fairing for back engine and cooling air outlet on trailing edge of wing. |
| edtherenderman | Scratch Built Bugatti 100P | Build | 14-Nov-21 19:44 |  |
| Views : 197 |
| Bottom View |
| edtherenderman | Scratch Built Bugatti 100P | Build | 14-Nov-21 19:44 | 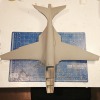 |
| Views : 224 |
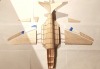
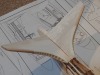
| Taking a break for the holidays so thought I’d post the current state of the Bugatti. 3D printed exhaust fairing and cooling air outlets that are on the trailing edge of the wings. Glued and filled with spackling, then coated entire model with five coats of thinned EZ-DOPE. Finally, two coats of sanding primer. Next will be sanding the primer and filling anything that needs it. |
| edtherenderman | Scratch Built Bugatti 100P | Build | 05-Nov-21 22:04 | 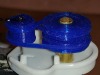 |
| Views : 214 |
| Same image at a slightly lower angle. |
| edtherenderman | Scratch Built Bugatti 100P | Build | 05-Nov-21 22:04 | 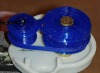 |
| Views : 284 |
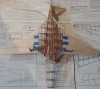
| Here are the pulleys with the belts, but pulled slightly out of the transmission housing. The lower drive pulley works the larger drive shaft which is the inside propeller. The upper pulley is the inside driveshaft for the outside propeller. Note the belt for the upper pulley is crossed. This creates the counter rotation. |
| edtherenderman | Scratch Built Bugatti 100P | Build | 05-Nov-21 22:01 | 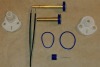 |
| Views : 227 |
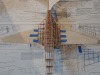
| I couldn’t let the counter-rotating transmission go! I realized that gears wouldn’t work, but what about belts! I re-designed the gears into pulleys and thought I would use rubber bands, but couldn’t find anything small enough. Then a friend at work told me he had some filament for his FDM 3D printer that was very flexible and stretchy. He let me borrow a spool and I printed out the belts. They worked okay, but didn’t grab well, so I also printed out the pulleys in the same material and it worked like a dream! |