| Hangar |
Aircraft |
Category |
Date |
Preview |
| LASTWOODSMAN | Herr Engineering HRR 105, Fokker D-7 | Parked | 02-May-17 16:14 | 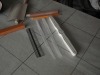 | | Views : 319 | | Prop outline is sanded smooth and a bit proud. |
| LASTWOODSMAN | Herr Engineering HRR 105, Fokker D-7 | Parked | 02-May-17 16:10 | 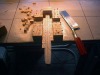 | | Views : 277 | | Easier to cut out. |
| LASTWOODSMAN | Herr Engineering HRR 105, Fokker D-7 | Parked | 02-May-17 16:09 | 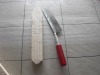 | | Views : 270 | | Lots of perpendicular side cuts to the prop outlines. |
| LASTWOODSMAN | Herr Engineering HRR 105, Fokker D-7 | Parked | 02-May-17 10:53 | 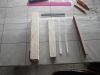 | | Views : 282 | | Since "Discretion is the better part of valour", I thought it would be prudent to carve up a practise prop block, to monkey around with and see how it shapes up first, and learn from those mistakes, instead of wrecking my good laminated prop block right away. |
| LASTWOODSMAN | Herr Engineering HRR 105, Fokker D-7 | Parked | 30-Apr-17 20:06 | 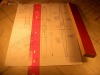 | | Views : 282 | | The laminated Prop Carving Block is freed up from its clamping prison, and squared up to 220 grit sandpaper. The next step is to drill a perpendicular center pin hole, trace some outllines from 0.0035" thick (22 pound) opaque Vellum tracing paper sheets. and transfer the outlines to the block. |
| LASTWOODSMAN | Herr Engineering HRR 105, Fokker D-7 | Parked | 29-Apr-17 12:03 | 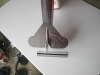 | | Views : 355 | | BACK TO THE DRAWING BOARD !! - I will cut it all out, sand it, glue raw tissue onto the plane, then shrink it and clear it, the normal way - but first, my 10" X 1 1/2" X 1/2" laminated prop carving block is dry after being glued and clamped up for a week - prop carving and sanding fun coming up !! |
|
| Hangar |
Aircraft |
Category |
Date |
Preview |
| LASTWOODSMAN | Herr Engineering HRR 105, Fokker D-7 | Parked | 29-Apr-17 11:57 | 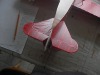 | | Views : 270 | | The pics show how awefully horrendous it looks on the plane. A DISMAL FAILURE ! At least I gave it the "old College effort" . |
| LASTWOODSMAN | Herr Engineering HRR 105, Fokker D-7 | Parked | 29-Apr-17 11:54 | 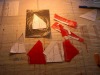 | | Views : 272 | | After all that work, I glued it on anyway (an exercise in futility), and tried to stretch it out flat, and reshrink it, to no avail. |
| LASTWOODSMAN | Herr Engineering HRR 105, Fokker D-7 | Parked | 29-Apr-17 11:50 |  | | Views : 279 | | When I cut the finished tissue out of the jigs after a few days, it shrunk into a homogenious, rippled, shrivelled, and wrinkled "Orange Peel" texture, from not being stretched taught, as it was stretched perfectly taught while in the jigs. |
| LASTWOODSMAN | Herr Engineering HRR 105, Fokker D-7 | Parked | 29-Apr-17 11:46 | 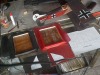 | | Views : 248 | | RIGHT STAB TISSUE REPAIR - My original intent was to try to match the red and black tissue on the plane, by shrinking and clear coating a red and a black tissue panel in jigs first, then cut it out and just glue it on. |
| LASTWOODSMAN | Herr Engineering HRR 105, Fokker D-7 | Parked | 27-Apr-17 12:20 | 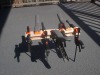 | | Views : 340 | | The laminated prop carving block is all glued up and clamped with two larger outside 1/8" thick clamping protection bare balsa sheet plates. There should be thick grain lines of alternating bronze and burnt sienna colors with enough bare balsa between them to accept red "Cabernet" wood stain after prop carving and sanding - I hope ... |
| LASTWOODSMAN | Herr Engineering HRR 105, Fokker D-7 | Parked | 27-Apr-17 12:12 | 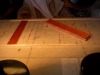 | | Views : 289 | | The planks are being white glued and stacked - the bronze side face of one plank is glued to the bronze side face of the next plank, and the burnt sienna side face of one plank is glued to the burnt sienna face of the next plank etc etc - the glue should dry invisible. |
|
