| Build Thread, Page :
1 2 [ 3 ] 4 5 (97 posts, 20 posts per page, 5 pages in total)
|
[ < Prev ] [ Next > ] |
| heywooood, Comment for image # 39825 | 22 Jan 18 10:50 |
| infill on the bottom extends to the second step.. |
| heywooood, Comment for image # 39826 | 22 Jan 18 10:50 |
| here you can see the shortened nacelle..F2 has the round bulkhead mounted on the back side while F1 has the bulkhead on the face for a good smooth mounting surface (the actual formers are from front to rear F2 - F3 - F4 but I swapped F2 and F3 to get the smooth face at the front - it works because they are exactly the same size) |
| David Duckett, Comment for image # 39837 | 22 Jan 18 10:46 |
| Exceptionally well done, as usual!! |
| heywooood, Comment for image # 39827 | 22 Jan 18 10:45 |
| test fitting the cowls to the nacelles...this was before I shortened the cowls. Using the cowls to cut the circular bulkheads insures a good fit |
| Don C, Comment for image # 39837 | 22 Jan 18 10:44 |
| That is a superb build. Very well done. |
| heywooood, Comment for image # 39828 | 22 Jan 18 10:44 |
| made two of these rudimentary radial engines.. |
| heywooood, Comment for image # 39829 | 22 Jan 18 10:43 |
| here is the fuel panel with the levers installed, simulated switches and painted |
| heywooood, Comment for image # 39830 | 22 Jan 18 10:43 |
| checking the fit of the Dumas kit provided lower nacelle cover. It only needed to be trimmed about 1/4" or so shorter at the front. it conformed to the more circular shape when I pressed it down against the wing and forward, rounded balsa nacelle section - perfect |
| heywooood, Comment for image # 39831 | 22 Jan 18 10:41 |
| here is the cabin interior looking through the side windows.. |
| heywooood, Comment for image # 39832 | 22 Jan 18 10:40 |
| shot of the infill and the cockpit rear wall. I have cut out the opening to the cabin, added the overhead fuel control panel, and the seats |
| heywooood, Comment for image # 39833 | 22 Jan 18 10:39 |
| I used the Catalina cowls as a pattern to cut matching dia. balsa circles 1/16" thick to attach to the faces of the provided oval bulkheads to change the nacelles from the inline Ranger engine profiles to the round radial shaped profiles., |
| heywooood, Comment for image # 39833 | 22 Jan 18 10:37 |
| these are the modified nacelles. I shortened them by leaving off the first bulkhead. |
| heywooood, Comment for image # 39834 | 22 Jan 18 10:36 |
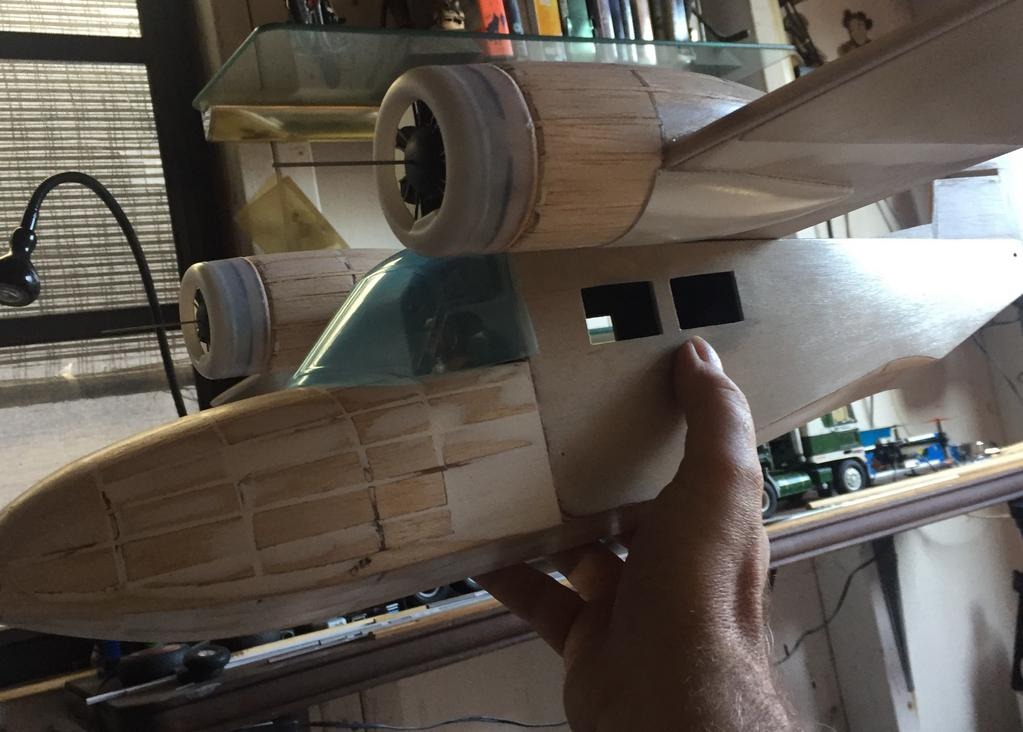
| here you can see the fuselage forward section is infilled with balsa - the rear section is sheeted with 1/64" thick birch ply. You can see that I shortened the plastic cowls by about 5/8" by placing the xacto knife on a 1/2" block of wood and spinning the cowling by hand against the blade tip. |
| heywooood, Comment for image # 39835 | 22 Jan 18 10:34 |
| the prop hubs came with the Guillow Catalina cowls that I ordered - I carved the prop blades in the usual way..note the blade stiffeners. |
| heywooood, Comment for image # 39835 | 22 Jan 18 10:32 |
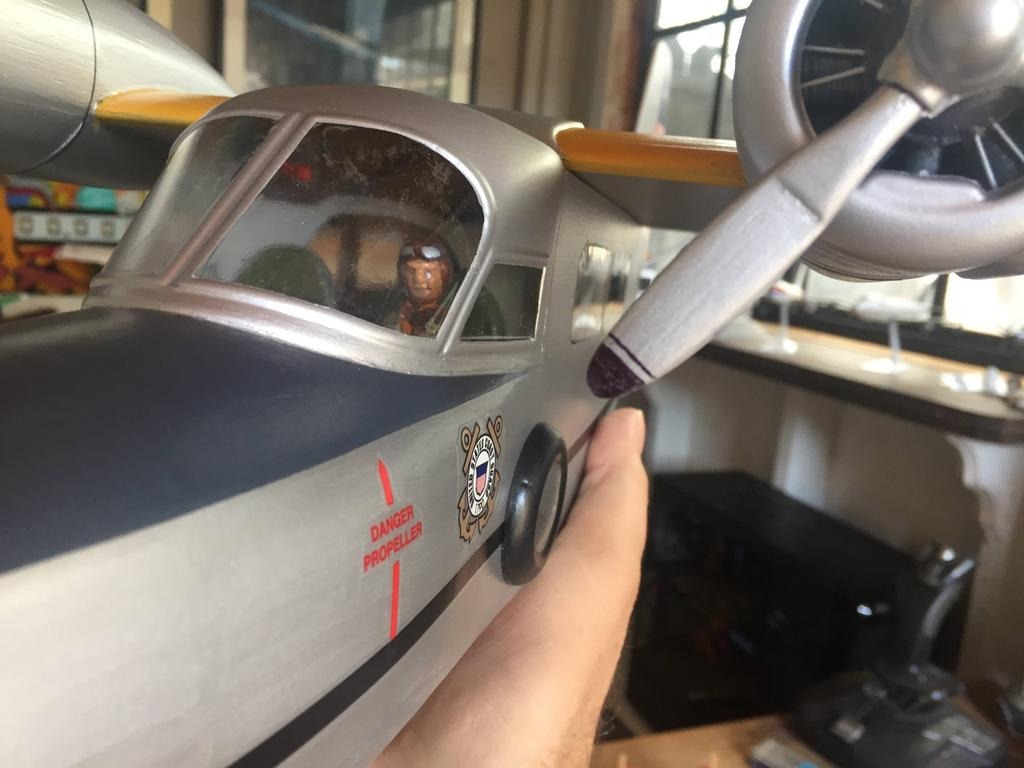
| the pilot is from parkflyer plastics - I built up both the cabin and cockpit interiors with 1/64" thick birch ply, balsa and card stock |
| heywooood, Comment for image # 39836 | 22 Jan 18 10:31 |
| here is a look at the floats and exhaust shroud and pipes. |
| heywooood, Comment for image # 39837 | 22 Jan 18 10:30 |
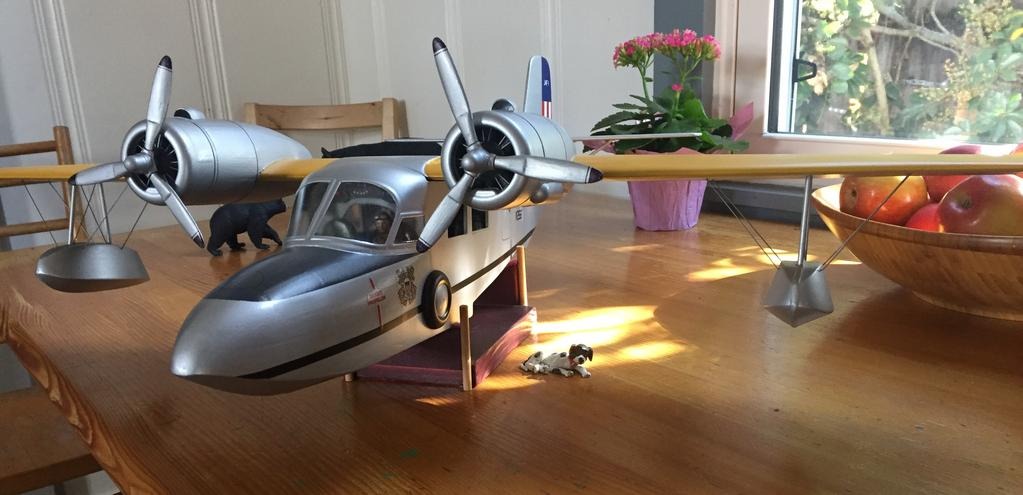
| here is the Dumas Grumman Widgeon kit # 328 modified with radial engines as so many in real life have been. |
| heywooood, Image # 39837 | 22 Jan 18 10:28 |
|
| heywooood, Image # 39835 | 22 Jan 18 10:26 |
|
| heywooood, Image # 39834 | 22 Jan 18 10:25 |
|
| Build Thread, Page :
1 2 [ 3 ] 4 5 (97 posts, 20 posts per page, 5 pages in total)
|
[ < Prev ] [ Next > ] |
